Recently we encountered a scenario where we were pen-testing a web service endpoint which employed a per request session-id which acted like a anti-CSRF token. This meant that a fresh id was issues for each request. If the session id was not correct in next request then user was logged out.
This looks too good from security standpoint and comes out as a dream for a security evangelist’s. However such situations come across as nightmares for security pentesters. Most of our automated tools fail to work including our beloved BurpSuitePro.
Some details about the application are listed below.
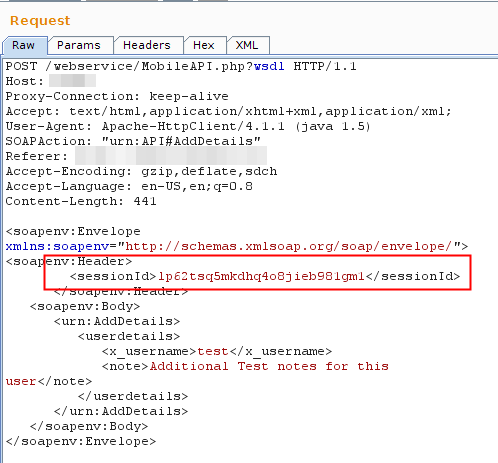
The API had multiple endpoints, all except the login required a session token in soap body. Session token was first issued when you send a login request, and subsequently with every request a new sessionid was provided in SOAP response body.
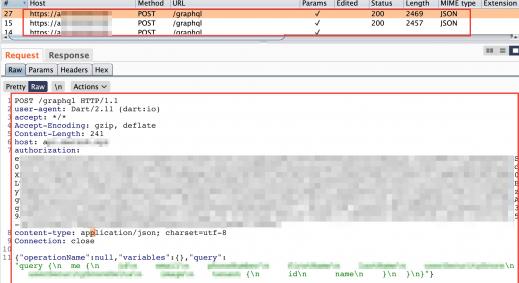
Example Request response sequence is shown below.
- Initial Login Request with no token but username and password
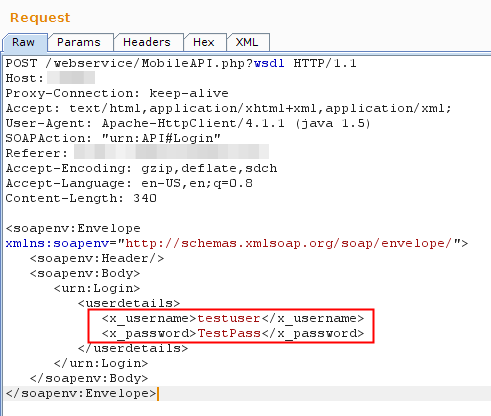 Initial Request with username and password
 - Initial Response with Session-id token
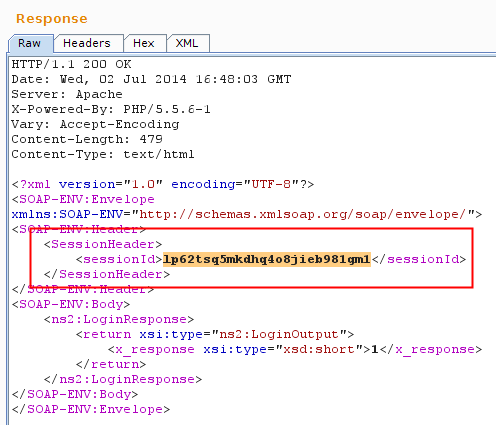 Initial Response with sessionid in response
 - next request containing session-id token from initial response
 Next request with inital sessionid added as header
Multiple people have already taken a jab at the similar problem and have suggested multiple solutions. A quick google search for "anti CSRF + Burp" will yield multiple results all providing similar solutions.
However things got interesting for us as we needed the request to be in XML structure and Burp as of now only support GET / POST parameter and doesn’t support setting values of XML parameter (It does a pretty good job of doing the same in intruder via arbitrary position selection but for scanner it is not possible at this point using burp).
Few others have also encountered similar situation before but no solution was publicly available so we sat down to write a solution and make it available for all.
So we ended up writing a small extension to do the job for us.
The core issue for us was the fact that
- Burp doesn’t allows for arbitrary location payload positioning while in scanner mode.
- The token was changing with every request.
So here is what we ended up with.
- A session handling extension. (performs token extraction and reuse it in next request)
- A Macro to perform login request, then pass the response to session handling extension which will place value into the XML body inside predefined tags. Macro has to be enabled for scanner
- In order to ensure good coverage and not random checks its advised to first send the request to intruder and select the xml elements you need to be checked. (avoid selecting session id for scanning as this will be overwritten)
- Run the active scan using “active scan defined insertion points” option.
Python code for the Extension that we built
from burp import IBurpExtender
from burp import ISessionHandlingAction
from burp import IParameter
import re
class BurpExtender(IBurpExtender, ISessionHandlingAction):
    def registerExtenderCallbacks(self, callbacks):
        self._callbacks = callbacks
        self._helpers = callbacks.getHelpers()
        callbacks.setExtensionName("Webservice session token extractor and repeater")
        callbacks.registerSessionHandlingAction(self)
        return
    def performAction(self, currentRequest, macroItems):
        requestInfo = self._helpers.analyzeRequest(currentRequest)
        headers = requestInfo.getHeaders()
        cookieList = self._callbacks.getCookieJarContents()
        msgBody = currentRequest.getRequest()[requestInfo.getBodyOffset():]
        m_response=macroItems[0].getResponse()
        macro_response=self._helpers.analyzeResponse(m_response)
        macro_response_body=self._helpers.bytesToString(m_response[macro_response.getBodyOffset():])
        sess_id=re.findall(r'<sessionId>(.*)</sessionId>',macro_response_body)
        msg = self._helpers.bytesToString(msgBody)
        msg = re.sub(r'(<sessionId>).*(</sessionId>)',r'1' + "".join(sess_id) + r'2',msg)
        msgBody = self._helpers.stringToBytes(msg)
        message = self._helpers.buildHttpMessage(headers, msgBody)
        currentRequest.setRequest(message)
        return
So Step by Step guide to configure this is below.
- Make sure Burp is configured with Jython standalone jar. (We recommend using 2.7b1 version available for download here)
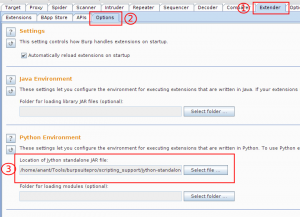 Ensure Python Environment is setup in Burp
 - Save the above code listed in a .py
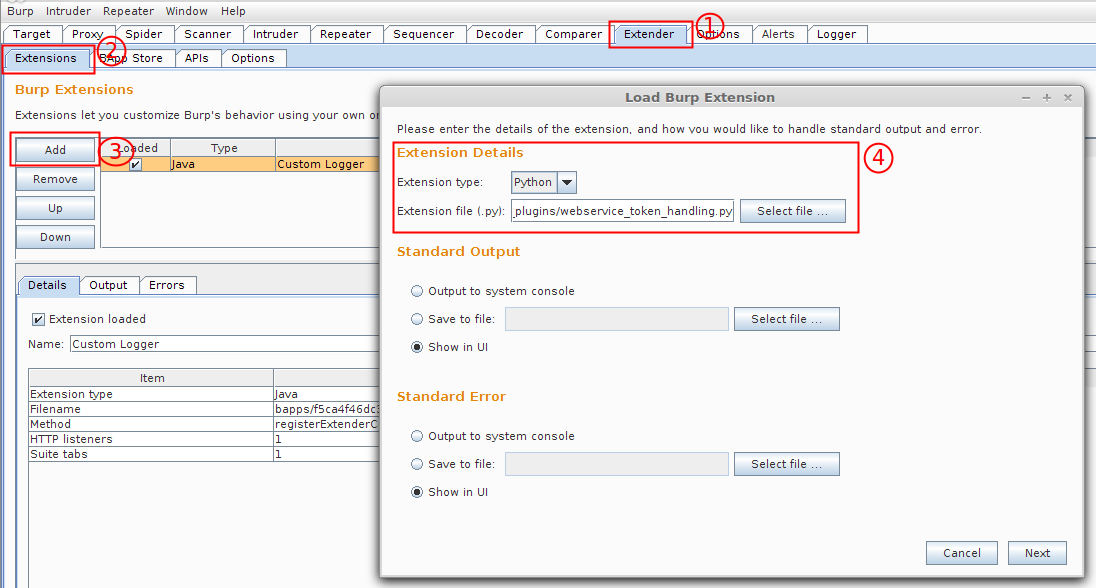
- Load the extension in Burp
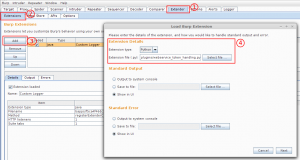 Loading python extension in Burp
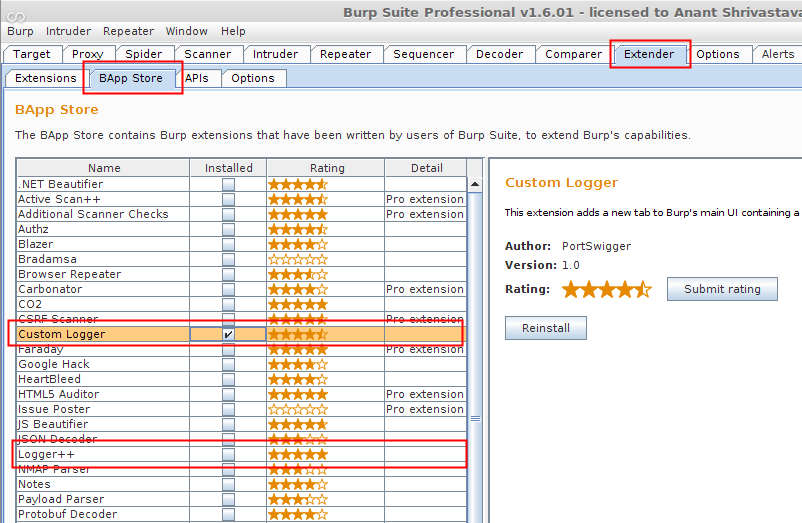
 - We also recommend loading either “Custom Logger” or “Logger++” to ensure you are able to see the active request response sent from Scanner.
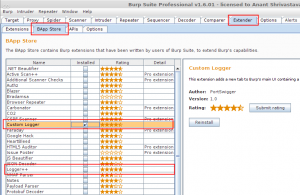 Logging Extension for viewing Request Response from Scanner
 - Once all these are loaded you need to create a session handling macro which will perform the session initiation request.
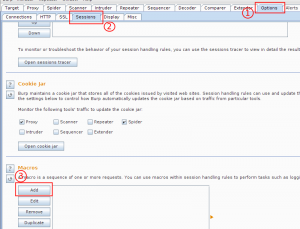 Burp Macro Creation Process Step 1
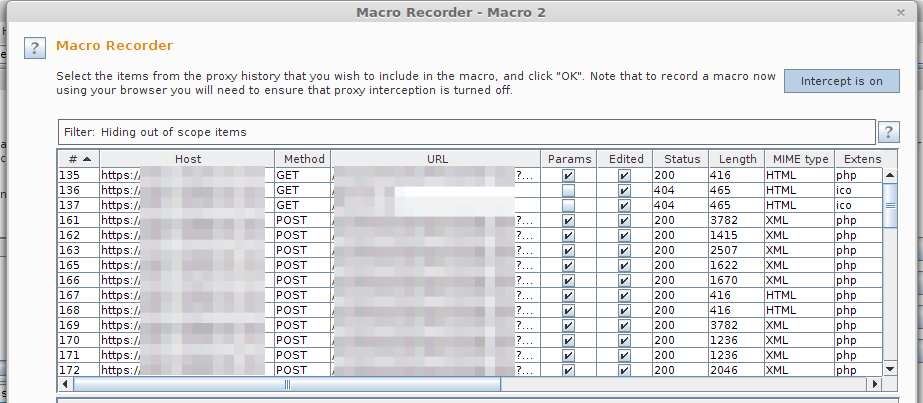
 - As soon as you click on Add Macro button multiple windows will open and top windows is macro recording window. This window can be used to select the existing login request or record a new login request.
 Burp Macro Creation Process Step 2
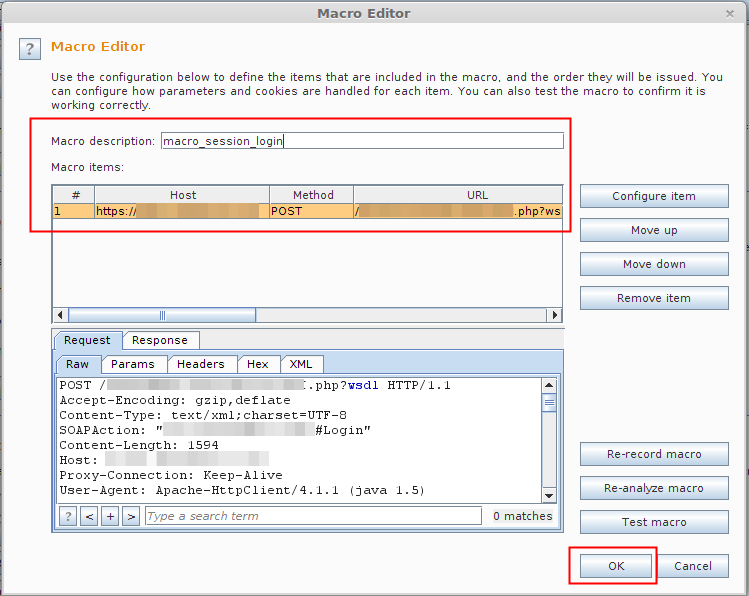
 - Once the request for Login is select we will have a windows listing the request place a unique name for the macro and select OK to close the windows.
 Burp Macro Creation Process Step 3
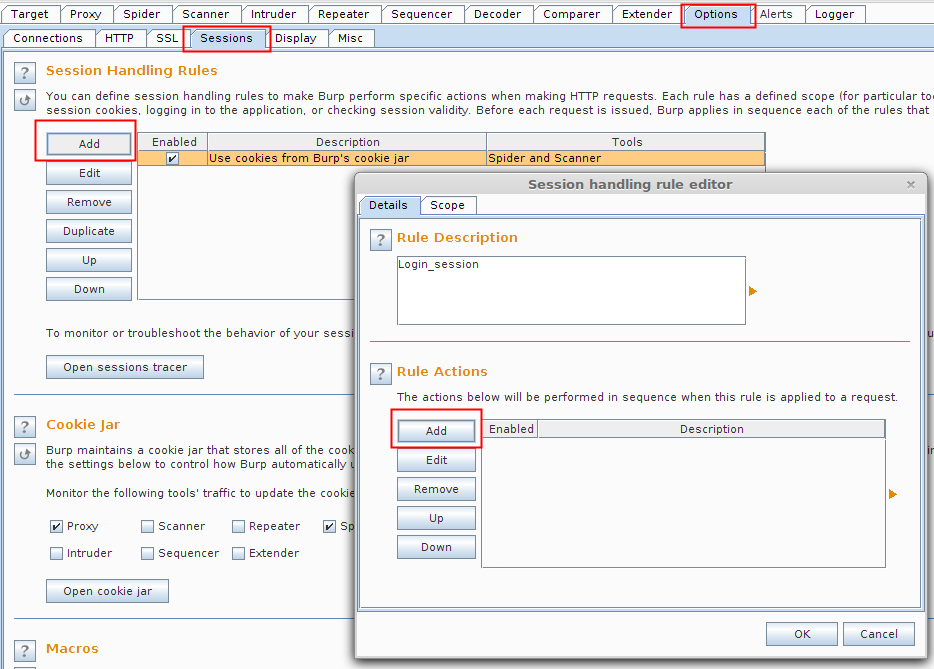
 - Now we need to configure a Session handling rule. Provide a unique name as session rule name and then under rule action click on Add => “Run a macro”.
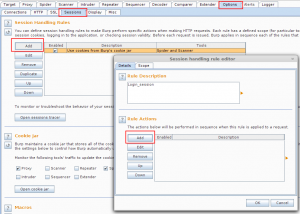 Burp Session Handling Rule Step 1
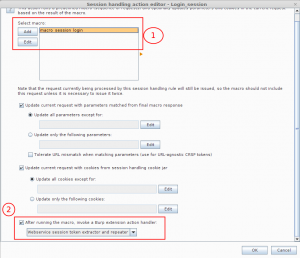
 - Selecting this option will open a new window showing all the available macro that can be used and some other options too. Here we need to select the previously created macro and select last option which says “After running the macro invoke a Burp Extension Handler” and in the drop-down list you should see an option “web-service session token extractor and repeater” select the entry.
 Burp Session Handling Rule Step 2
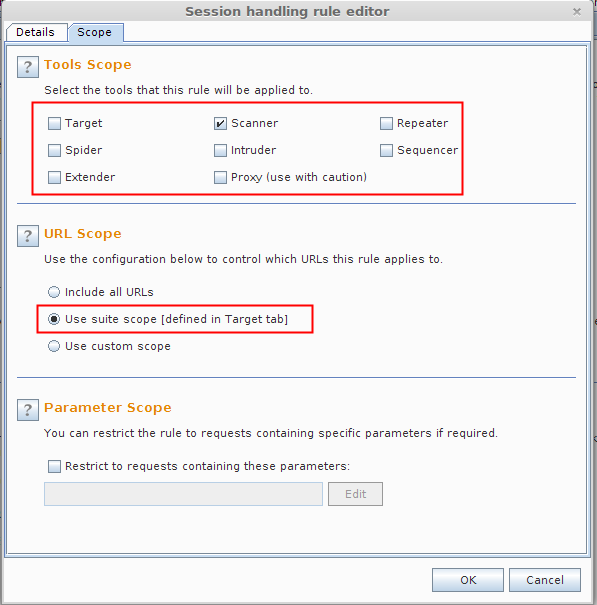
 - You will again reach the session handling rule editor, select the second tab i.e. “Scope”, here we deselect all tools except Scanner and we select the scope as suite scope. You can define custom scope if you want.
 Burp Session Handling Rule Step 3
 - Now you are ready to use the scanner. Select the request that you want to investigate and send it to intruder. Clear all preselected insertion points and add your own fuzzing points and then right click and select “active scan defined insertion point”
- Here while scanner is running to check if the plugin is working as expected or not you can use the custom logger / logger++ plugin we installed before. They will list all requests made from scanner in similar to proxy history method.


There is a caveats that is to be kept in mind. As every request would be accompanied by another login request and hence the request count will be double i.e for test which need 100 requests we will be making 200 requests hence expect slow scan.
However in my understanding the advantages out-weights the caveats.
Happy Web-service Hunting
While we are at webservice testing here is a Bonus tip from our side:
While nothing beats SOAP-UI in SOAP request generation we encountered a problem when we wanted to force SOAP-UI via Burp. Soap-UI was not able to make a SSL request as the Burp SSL certificate was not recognized by JAVA cert store and gave Peer not authenticated error.
![]() SOAP-UI Peer SSL Error
SOAP-UI Peer SSL Error
Here is a bonus trick to get around this error.
Open your Burp proxy settings via Proxy => Options => Proxy Listeners (Edit) => Request Handling => Select Force use of SSL.
Now go back to SOAPUI and change endpoint from https to http and port 443 ie. soap action host:443/?WSDL and the service will work flawlessly.
If you would like the NotSoSecure team to assess your web applications, please get in touch with us.