During one of our recent web application penetration testing assignments, @realsanjay encountered a scenario where the application employed an integrity check on HTTP request content. The integrity check was maintained using a custom HTTP header that stored the HMAC of HTTP request content based on session-specific CSRF tokens. Any modification in the HTTP request would result in a “499 Unknown” HTTP error response.
TL;DR
A Burp extension to pentest an application adding an integrity check via custom HTTP Header with HMAC of request.
Problem Statement
To pentest such an application or to modify its request content in Burp’s Proxy, Repeater, Intruder, or Scanner, it is required that the HMAC of request content be re-calculated. It is also required that the HMAC in the custom header of the captured HTTP request is modified and then this request is forwarded to the server.
Problem Analysis
Before going ahead, let us understand the details of the application’s HTTP request integrity checks:
- Application receives Session-specific CSRF tokens as a part of successful login responses.
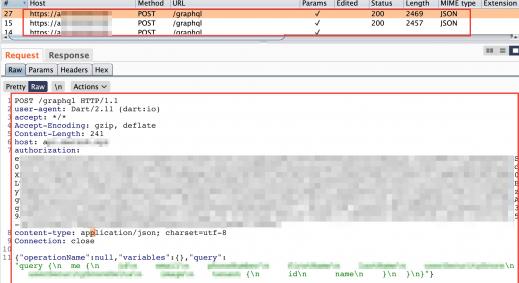
- For every post-authentication request, you will observe that HMAC is calculated. Where,
- Data = Request URL+POST Data
- Key = CSRF Token
- HMAC = (Data, Key)
- HMAC is passed as “X-V3-HMAC” custom HTTP header in HTTP requests.
- The server validates HMAC against the content passed in HTTP request based on the session-specific CSRF token generated during successful login to the application.
- Any modification done in the request in Burp Suite results in “499 Unknown” response as shown in Figure:

Solution
Pentesting an application that has integrity checks is difficult, as every automated tool including Burp Suite would fail to provide fruitful results that are obtained otherwise. To tackle this situation, we tried to build a solution using Burp extension.
There are multiple programming languages that support creation of Burp extensions:
- Java
- Python
- Ruby
Hold-on! Before we go any further, follow “https://portswigger.net/burp/extender/writing-your-first-burp-suite-extension” to understand the basics of Burp Suite extension flow.
For the purpose of this blog, we used Java programming language to create Burp extension for the above mentioned problem.
Steps to create Burp extension are mentioned below:
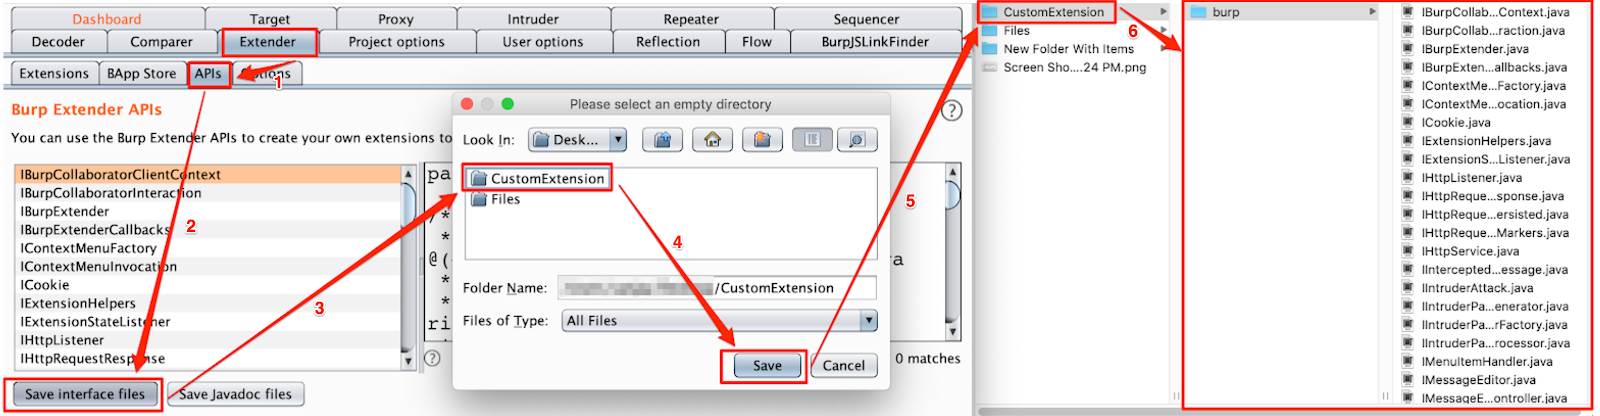
Step 1: In order to create Burp extension using Java, it is required that Burp Extension API interface files are saved in a directory (In our case it’s CustomExtension) as shown in Figure:
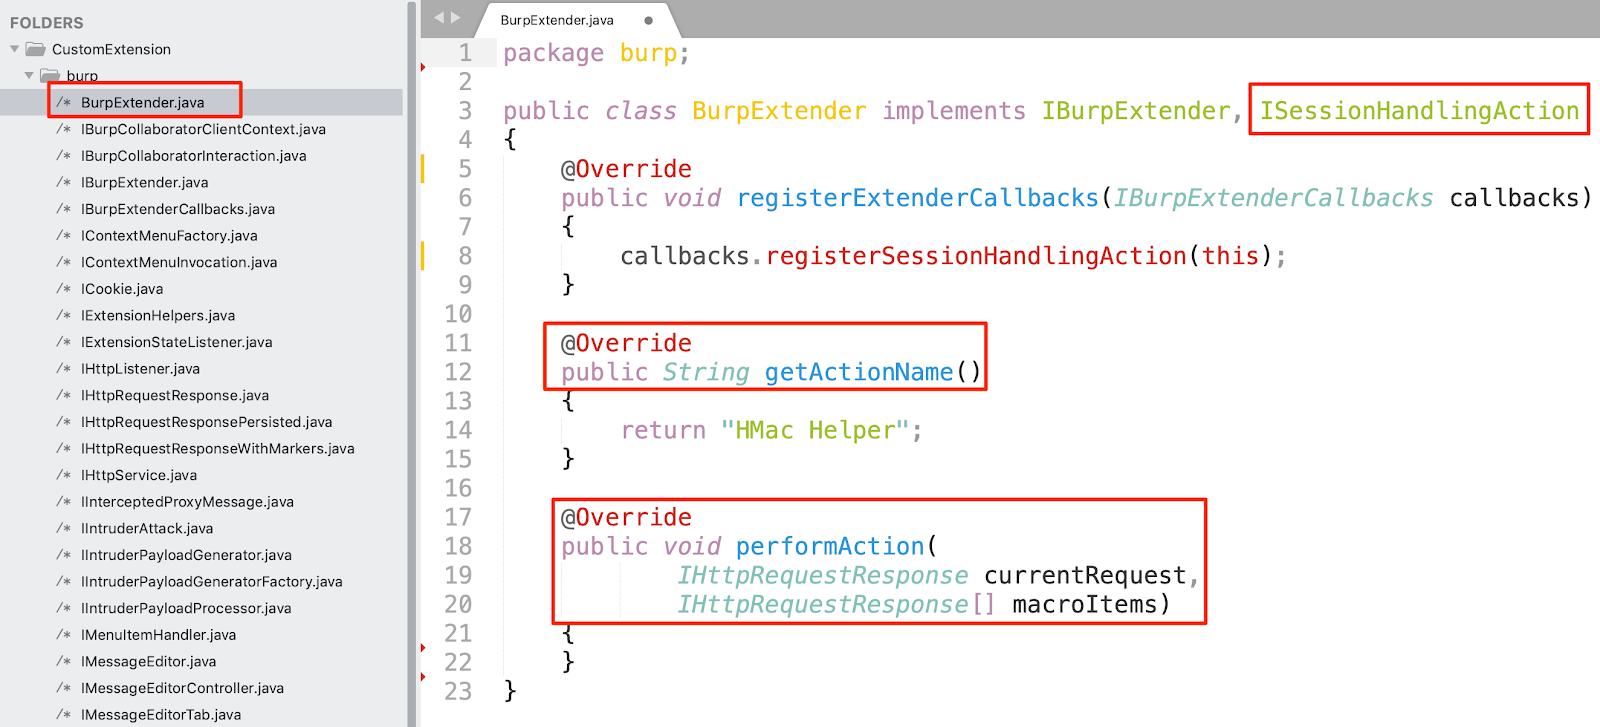
Step 2: To create a Burp extension, create “BurpExtender.java” file in the “burp” directory (this is inside the directory created in the above step). To create Burp extension which runs for Proxy, Repeater, Scanner, Intruder, etc., it is required that “ISessionHandlingAction” interface and also it’s two methods “getActionName” and “performAction” are overridden as shown in Figure:
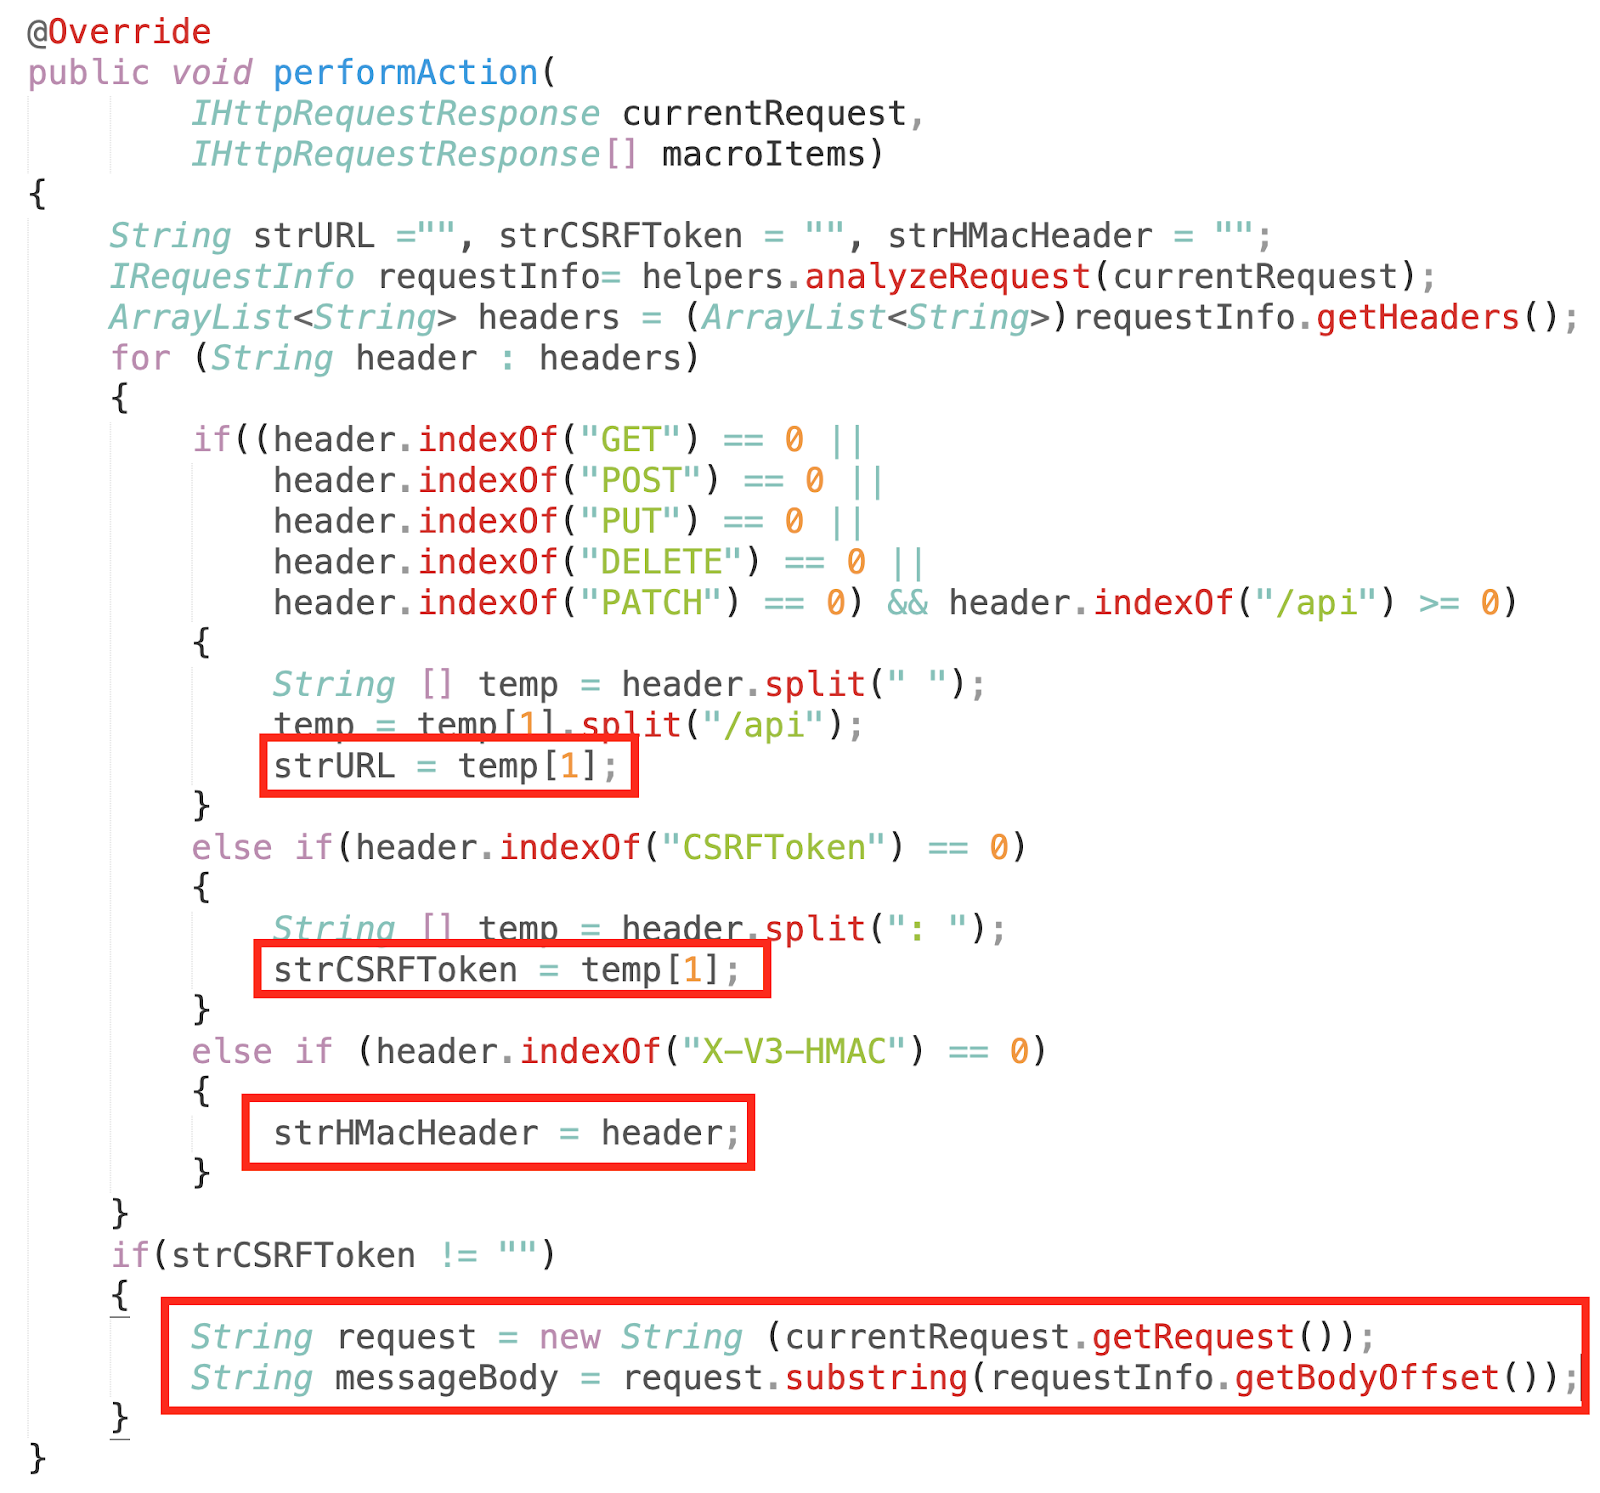
Step 3: In order to re-calculate HMAC (X-V3-HMAC), we captured the CSRF Token, HMAC and POST Data from HTTP request. This was achieved using the code as shown below:
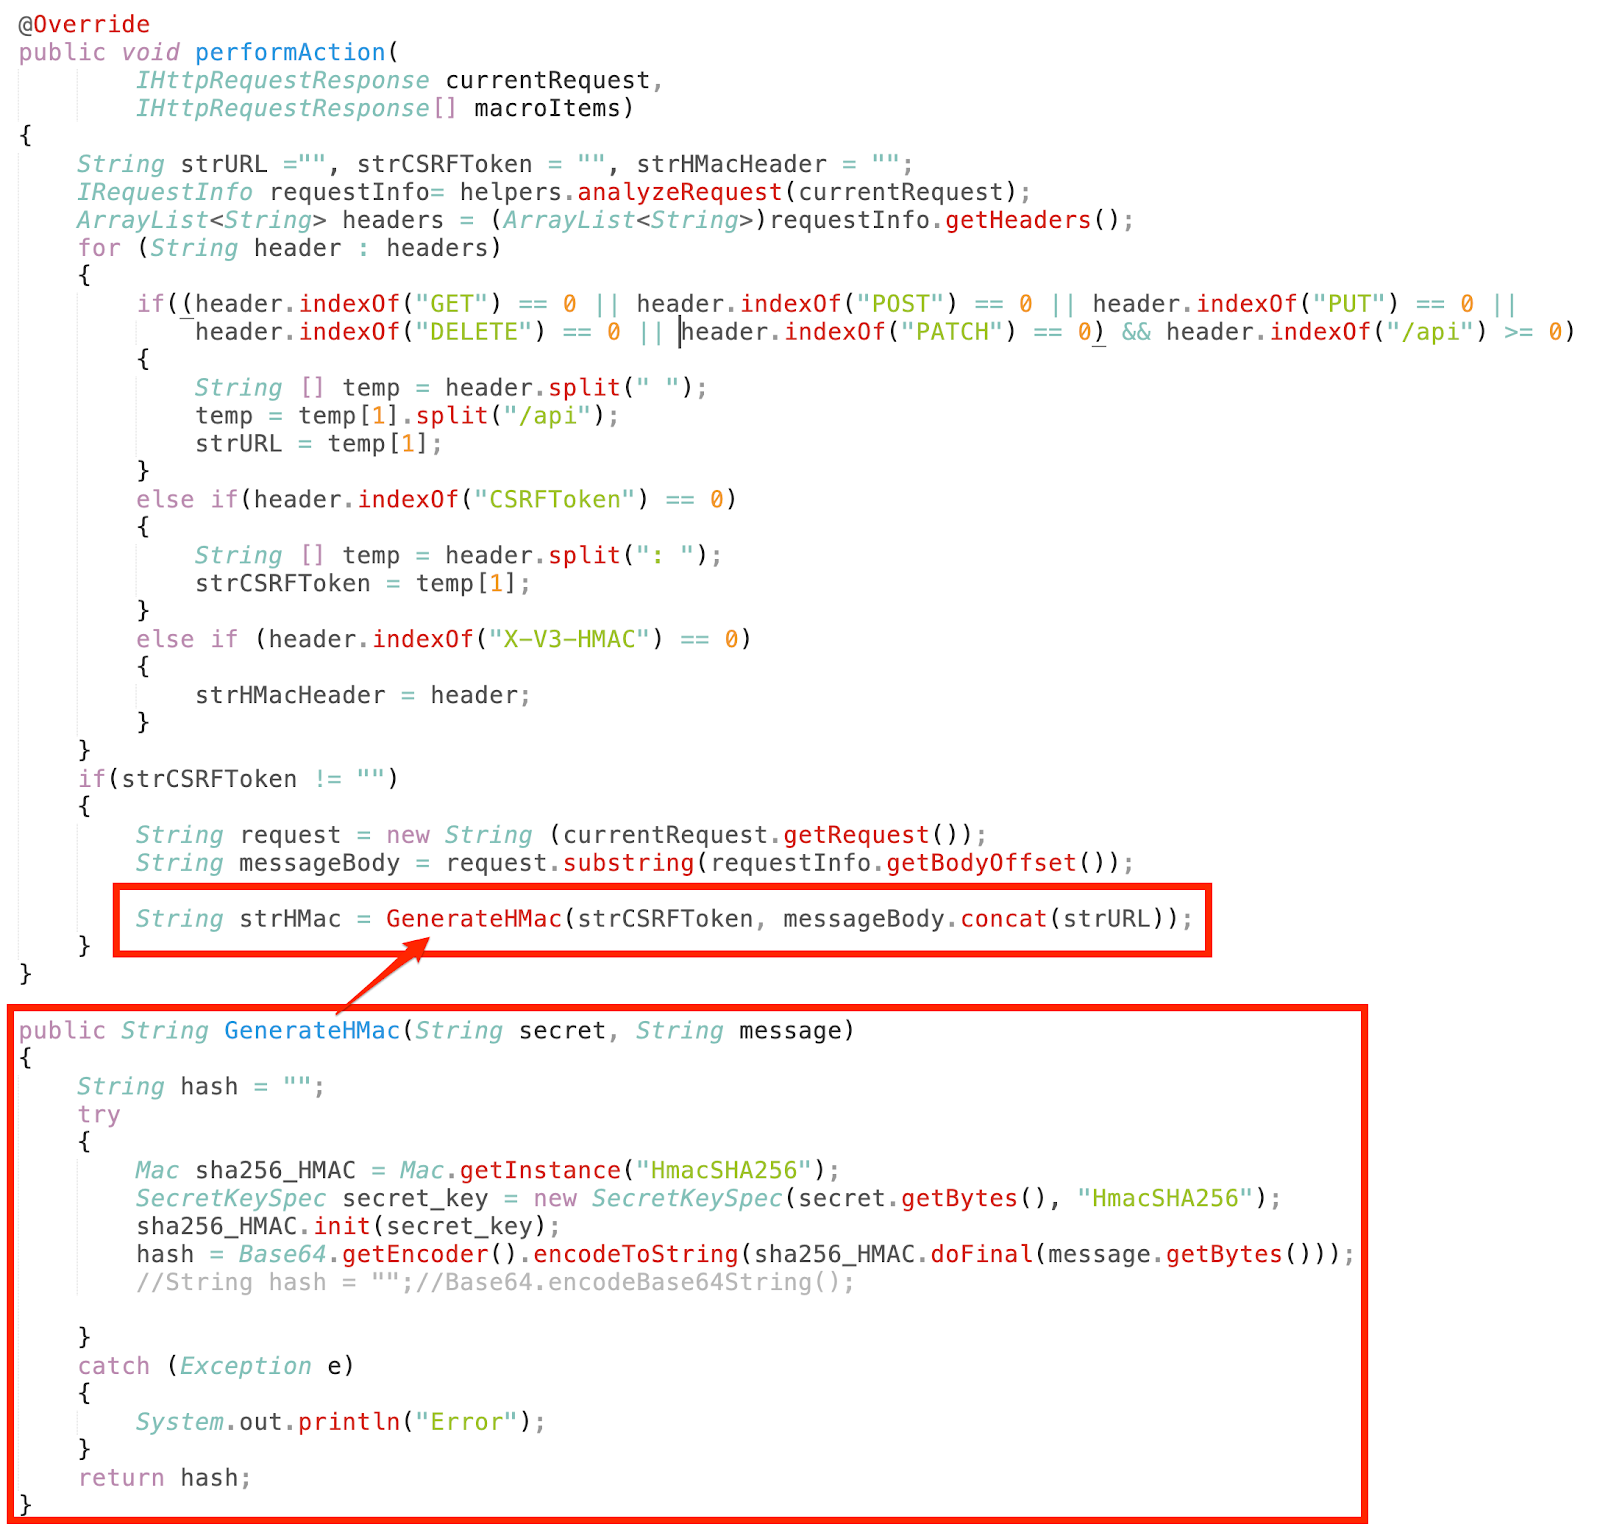
Step 4: After collecting the data from HTTP request which is used to generate HMAC (X-V3-HMAC), we re-calculated the HMAC using the following code.
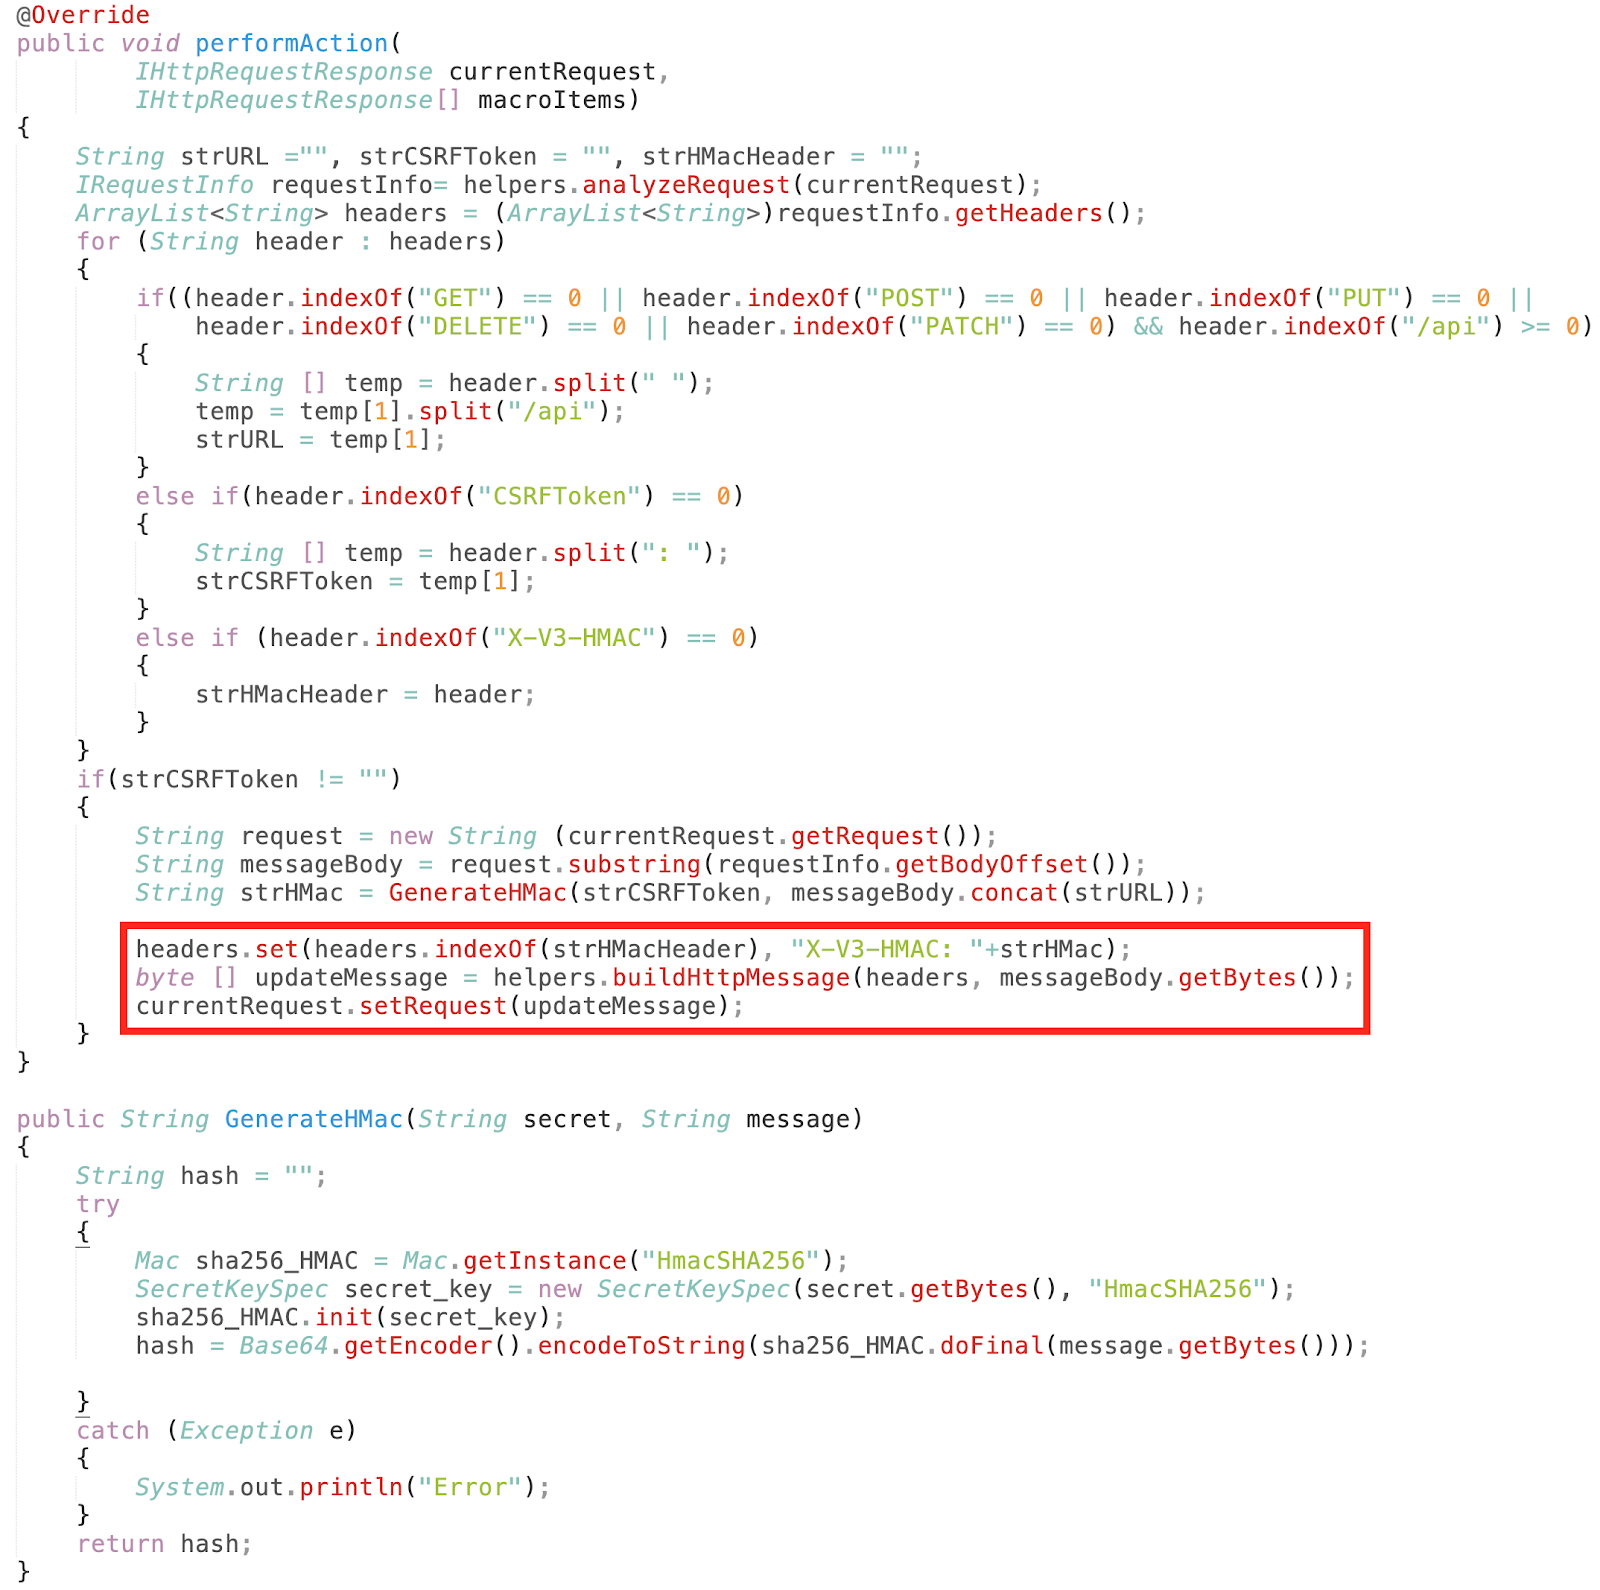
Step 5: Replace the newly generated HMAC value with old HMAC value of HTTP request as shown in Figure:
Step 6: To deploy the extension we need a single jar file. To compile the Burp extension and create a jar file from it, use the following command:
mkdir build
javac -d build burp/*.java
jar cf hmac.jar -C build burp

Step 7: In order to run this extension, add the newly generated jar file (hmac.jar) in extension list as shown in Figure:

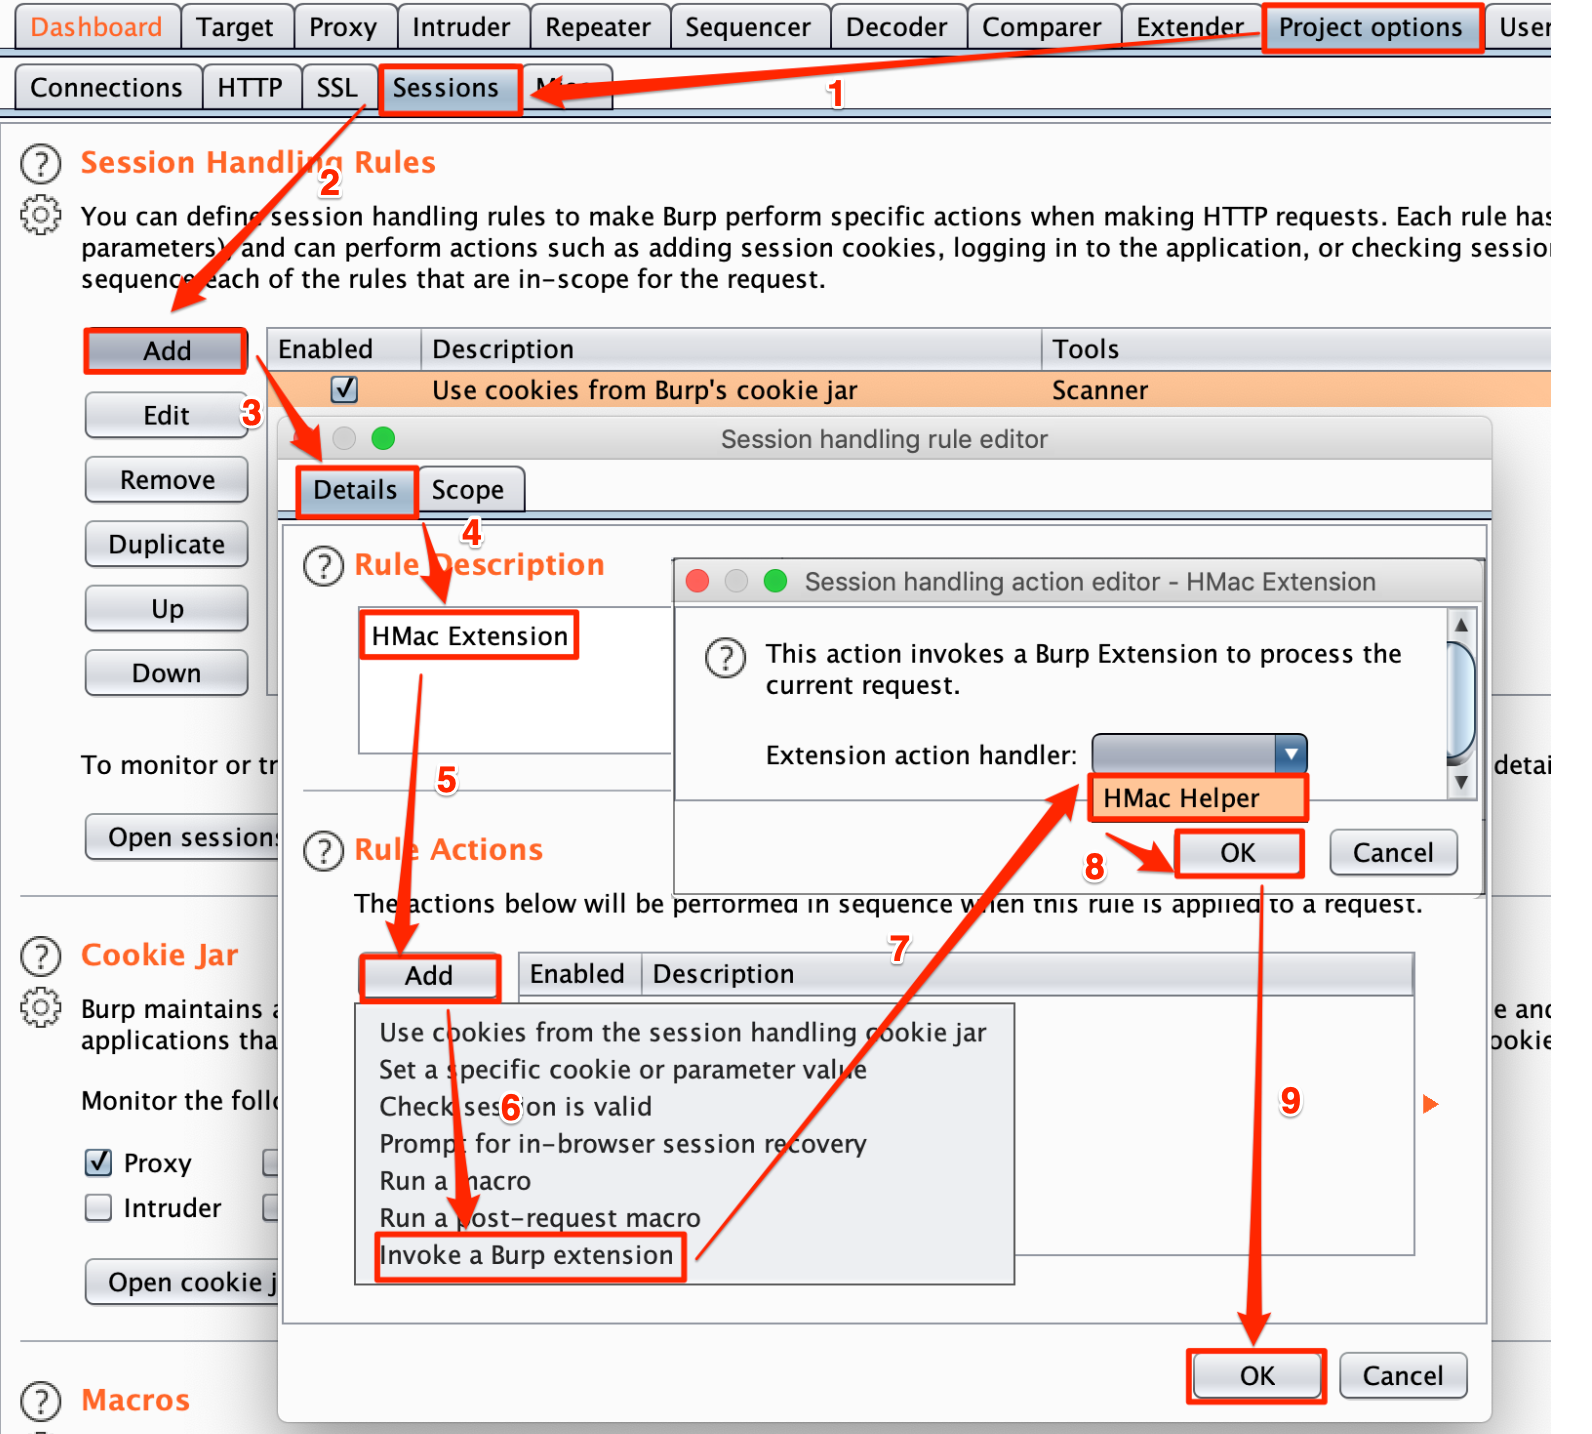
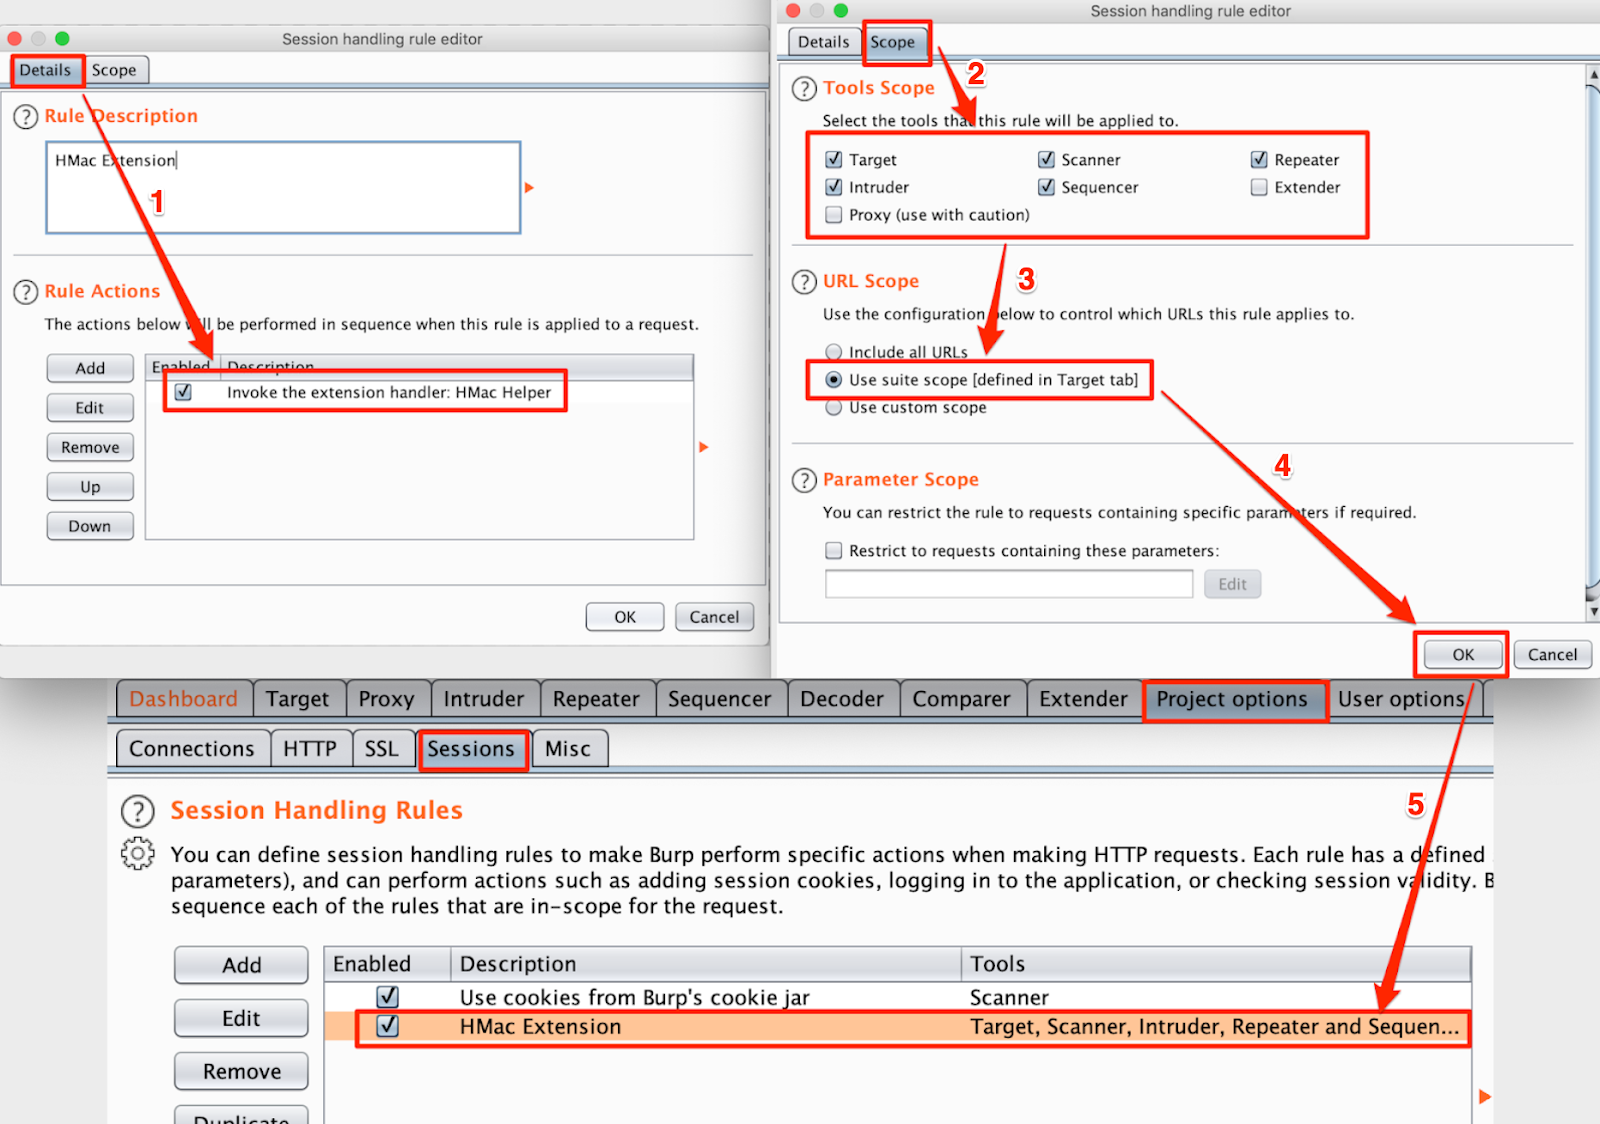
Step 8: To use this extension for Burp Repeater, Scanner, and Intruder we need to add the “Session Handling Rules” as shown in Figure:
Note: To get our custom extension name in “Extension action Handler” drop box as an option, the Burp Extension must implement “ISessionHandlingAction” method as shown in Step 2.
Step 9: After the new Rule Extension is saved as shown in the above step, we can select the required information from Scope tab as shown in point 2 in below image, the new session handling rule created as shown in point 5 in below image and run our Burp extension for “Target, Scanner, Repeater, Intruder, Sequencer” for the URL in Scope.
Note: You may change scope as per requirement.
Conclusion:
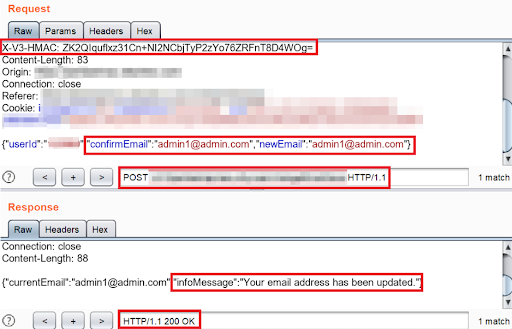
As a result of the deployed extension, hereafter any modification of HTTP Request in Target, Intruder, Repeater, Sequencer, or Scanner, the extension will re-calculate the HMAC (X-V3-MAC) based on the modified value and then forward the request to the application server. The application server will accept the request and respond with “200 OK” as shown in the figure:
Marketing
Interested in such scenarios and how to deal with this, more such scenarios can be found in our Advanced Web Hacking class or Get in touch if you would like our consultancy service to pentest your Web Applications.